Tuesday, August 28, 2012

Gazpacho


Yesterday morning I came in from the garden with baskets full of tomatoes, sweet green bell peppers, cucumbers and patty pan squash.  Inasmuch as the Mister and I enjoy eating fresh salads and grilled veggies from the garden, I wanted to make something for supper that simply sang summer fresh, Fresh, FRESH vegetables!  The answer to the dinner dilemma?  GAZPACHO!  The name itself is  lyrical and musical to say and the combined vegetable flavors build to a crescendo of summertime and freshness.


Fresh Vegetables!   No cooking required.  Just chop, mix, chill and serve.


Cold!  Refreshing!  Each spoonful singing the praises of garden fresh vegetables.


The ingredients are simple, fresh, not cooked or processed...all natural!


The soup base is made from ingredients you probably already have in your pantry:


A simple GAZPACHO recipe:

Ingredients:
2 lb tomatoes, peeled, cored and chopped (about 6 medium tomatoes)
1 lb cucumbers, peeled, seeded, chopped (about 2 medium cucs)
1 patty pan squash, seeded, chopped
1 cup green pepper (about 1 large)
1 cup chopped onion (about 1 large onion)
1/2 cup finely chopped celery  (about 1 stalk)
5 cups tomato juice (can use vegetable juice like V-8)
1/2 cup red wine vinegar
1/2 - 1 teaspoon red pepper flakes (depending on your taste for spiceness)
1 clove garlic
1 tsp salt
1/4 black pepper

Directions:

COMBINE all ingredients in a large bowl or soup pot.  Chill until very cold and serve!

THAT IS IT!  ALL YOU DO!  Gather your veggies and ingredients, chop, mix, chill and serve!

This recipe will make approximately 7 (16 oz.) pints.  I made this recipe and now in my freezer have containers of SUMMERTIME FRESHNESS to enjoy this winter.  To freeze all you have to do is:
  • LADLE soup into clean jars leaving 1/2 inch of headspace.  Place lids and bands or plastic storage caps on jars.  Twist on lids.  Label
  • FREEZE up to 1 year.

I can't sing enough praises for Gazpacho.  And I'm really happy to know that this winter I can pull out a container of it from the freezer and be reminded of the fresh taste of summer even on the dark and gloomy days of winter.

Until next time,
Cheers!

Jennifer

Monday, August 27, 2012

Easy Peasy


It is that time again!  It is time for another House Mouse and Friends Monday Challenge Blog theme challenge.  The new challenge #127 is Back to School or the Office.  We are looking forward to having you play along in the challenge using your House Mouse, Happy Hopper or Gruffie stamps following the school or work theme.


Card Recipe:
Stamps: Stampabilities "Chalky Consequences" #HMJR1022 and Papertrey Ink Sentiment "Easy Peasy"
Ink:  Memento Tuxedo Black.  Image colored with Copic Markers
Paper:  K & Company
Accessories:  Nestibilities tag die, Stampin' Up! bakers twine, White Liquid Pearls for the chalk, Pop Dots,  Measuring Tape Ribbon and buttons from my sewing box.


Be sure to scurry on over to House Mouse and Friends Monday challenge blog to see all of the fab cards the Design Team have made and then be sure to post one of your own.  As always, there are really fun prizes to be won.  This week our sponsor is:


One lucky winner will get a $25 Gift Certificate to shop at the official House-Mouse Designs store.

And don't forget to go to House-Mouse Designs site HERE and submit your card in their gallery.

As a BONUS, our very own lovely Team Mate AMERICA is also adding a Design of the Month Mousey Stamp from April 1999 - as an extra prize. The stamp is by Stampa Rosa/House-Mouse Designs, called "Computer Tutors". very fitting not only for the school/office theme.

Looking forward to seeing everyone's back to school/office creations!

Until next time,
Cheers!

Jennifer

Sunday, August 26, 2012

What's Under the Cake Dome Sunday #7

YIKES! I've created a monster! A dessert monster, that is. Ever since I bought this covered cake dome in a consignment shop, the Mister has insisted (ok...highly encouraged me) every weekend it should be filled with some type of sweet, yummy dessert and it is now time to unveil this week's What's under the cake dome Sunday # 7. Are you ready?
Snickers Cheesecake


Oh yes....snickers candy bars cover an Oreo cookie crumb crust....layered with creamy cheese cake...
 
 
...and topped with caramel sauce and peanuts.


Would you like a slice?


Are you ready to make a Snickers cheesecake?  Sure you are and here is the recipe:
Ingredients

Crust:

  • 24 chocolate sandwich cookies (such as Oreos)
  • 4 tablespoons unsalted butter, melted
Filling:
  • 3 8-oz. packages cream cheese, at room temperature
  • 3/4 cup sugar
  • 3 large eggs, at room temperature
  • 2 teaspoons vanilla extract
  • 1 teaspoon lemon juice
  • 1 tablespoon cornstarch
  • 3 regular-size Snickers bars, cut into 1/4-inch slices
  • 1/4 cup caramel sauce, optional
  • 1/4 cup chopped roasted and salted peanuts, optional

Preparation

  1. Make crust: Preheat oven to 350ºF. Mist a 9-inch springform pan with cooking spray. Wrap bottom and sides with 2 large foil pieces. Pulse cookies in a food processor until crushed. Pulse in butter. Press into an even layer in pan. Bake until firm, 8 to 10 minutes. Let cool.
  2. Make filling: Place a roasting pan filled with 1 inch hot water on oven's center rack. Beat cream cheese until smooth. Add sugar; beat for 1 minute. Beat in eggs. Scrape down sides and bottom of bowl. Beat in vanilla, lemon juice and cornstarch.
  3. Sprinkle Snickers over crust. Pour batter into pan; place in water bath. Bake until cake is set around edges but still jiggles in center, about 55 minutes.
  4. Remove cake from roasting pan; remove foil. Place cake on a rack to cool. Cover and chill until firm, 4 hours or up to 1 day. When ready to serve, drizzle top with caramel sauce and top with chopped peanuts, if desired.

Until next time,
Cheers!

Jennifer

Friday, August 24, 2012

Bicycle Birthday card


I needed a masculine birthday card.  The problem...how can I use lots and lots of the sparkly, blingy and glittery accoutrements that I love so much and still keep the card masuline?  Well, I'm not sure how successful I was but this is what I came up with.  I used philips head screw brads and use a bicycle image that the recipient will (hopefully) appreciate.


The bicycle image is actually a Dreamweaver stencil.  I applied "sticky paper" to the back side of the stencil and then carefully applied the different colors of ultra fine glitter to the openings on the stencil.  This is NOT a fast process.  Once any color of glitter hits the sticky paper it is there to stay so one must work in small areas and change colors as you proceed to fill in the image.  Once the image is filled in entirely you carefully remove the paper from the back of the stencil and immediately pour crystal glitter over the entire image.  Trim and mat the image and proceed to make your card as you normally do.  NOTE:  People have said to me that they are afraid to use sticky paper on the back of their stencil as they are afraid of damaging the back or the paper not coming off.  I rub candle wax on the back of my stencil and the paper comes off perfectly and there is no damage to the stencil so that it may be used for embossing and with embossing paste too.

Card Recipe:
Stamps:  Stampin' Up! Happy Birthday with candles is from the So Many Scallops set
Stencil:  Dreamweavers Stencils # LJ 895
Ink:  Stampin' Up Real Red
Designer Paper:  K & Company, Stampin' Up cardstock in red and yellow
Accessories:  Ultra Fine Glitter Glitter Glitz,  Making Memories Brads, Nestibilities circle and scalloped circle dies, Stampin' Up! Ticket corner punch, Stickles glitter glue bright yellow.

Where did the summer go?  I'm not ready for it to end.  I have so many projects going and will have a lot of new things to show  you that I've been working on.  I'll continue to stamp and make cards but I have some new activities and projects in furniture refinishing/reloving as well sewing projects and quilting.  Fun stuff!!  OH...and some new recipes I've tried I'll be sharing too.

I hope you'll continue to stop by and visit as I venture into some new-to-me projects and activities.

Until next time,
Cheers!

Jennifer

Tuesday, August 21, 2012

Cape Cod

The Mister and I took a much needed get-away trip to Cape Cod, Massachusettes and had an absolutely wonderful time! It was our first time on the Cape and so we feel it is ok and perfectly acceptable that we we behaved as the steriotypical tourists! I had my cameras at hand at all times snapping shots of scenery, wildlife, the ocean, buildings, people, sights......you get the idea. We bought t-shirts and postcards. We ate clam chowder and lobster and all varieties of seafood every single day. Oh what a wonderful trip. HUGE, HUGE thank yous go to my sister and brother-in-law for inviting us to come to Cape Cod and stay with them.

And what do you do when you go on holiday and return? You bore your friends and family with photos. So without further ado I want to share with you just a few of the 250 photos I took of beautiful Cape Cod.

Do you remember NECCO candies?  This is supposedly the candy/confectioner Oliver Chase's barn.  Chase was the inventor of NECCO candy.  I just love the looks of this building.
We took a seal watch cruise.  I was fascinated with the seals.
What a poser, eh?
There are thousands upon thousands of seals at the Cape so it was never hard to get a snap of one...or one hundred.

This bird, another poser for the amature photographer, is called a Cormorant (I think).

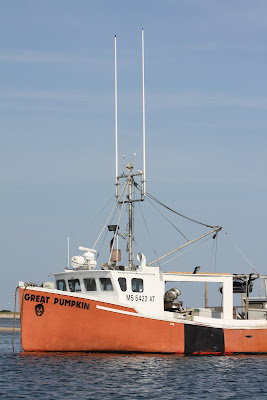
I just liked the name of this boat.  Don't you think I should somehow incorporate "Great Pumpkin" into a Halloween card?
A "modest" waterfront cottage.  WOW!
We toured Truro Vineyards.  FUN!
These grapes will one day be used in a Chardonnay.
A rare sighting of The Mister...posing with barrels of wine that are aging.  And yes, we did do a bit of wine tasting while at the Truro Vineyards.  Excellent!!
We visited Provincetown.  What a fascinating town!  I thought this building on the wharf was fabulous.

A blue Heron trying to hide from our view.
Each evening, as the sun set, we walked the beach.  The sandpipers played "tag" with the water lapping at the shoreline.
Always on the lookout for shells and wampum.
Watching the sunset...as well as the seals feeding close to the shore.
Another day ends with the setting of the sun.

I highly recommend a visit to Cape Cod if you've never been there.  I hope we can return someday.

Cheers!

Jennifer

Wednesday, August 8, 2012

Snap out of it!

I made this card intending it as a whimsical get well card.  Sometimes I want to send a feel better card with a little humor.  Afterall, humor is the best medicine, right?  This darling, and a little bit sassy image is called Patty and she is one of Mo Manning's digital images.  I just love her.  And for some reason I thought of Cher's character in the movie MOONSTRUCK where she shouts "Snap out of it."  It just seemed to fit for this card.

Card recipe:
Image:  Mo Manning Digital Pencil called Patty.  Sentiment is computer generated.
Ink:  Image colored with Copic Markers
Designer Paper:  Reminisce
Embellishments:  Pink Liquid Pearls, Pink stickles glitter, Pink Martha Stewart half pearls, Cuttlebug frame embossing folder, Pink Shear Creations ribbon, button and floral ribbon from my sewing box.


The current theme challenge DP2 Challenge is Anything Goes.  That makes it so much fun to see a whole variety of Mo Manning digital pencil images.

Until next time,
Cheers!

Jennifer

Friday, August 3, 2012

Beautiful Hydrangea


I've been trying to save my hydrangea in the garden during this hot, dry summer we are having.  This is only the second summer I've had my hydrangea plants so I'm still learning about their care.  But ohhhh I love them....unlike Madonna who, when one of her fans presented her with a bouquet of hydangea declared, "...I absolutely loathe hydrangea!"

While taking some cuttings for the dining room table centerpiece I happened to remember an Anna Griffin hydrangea stamp that I had.  This set was the very first acrylic (clear) stamp set I ever purchased.  I decided it was most definitely time to get the set out again and make a card with it.


My card is very simple.  I inked the stamp directly with Tombow markers in blue # 533 and green #133 and stamped directly on the white cardstock.  I restamped the image and cut out a few of tiny flowers and popped them up with popdots on the image to give some dimension.  I had this lovely Martha Stewart packet of floral paper and used it for the background.  Then added a few blue half pearls and some machine stitching and that was that.  I suppose I could add some more embellishment but I kind of liked keeping this card simple, so no ribbons, bows, buttons or sentiment tags today. 

As I mentioned, my hydrangea were really getting bedraggled looking in the heat we've been having so I cut some of the flowers and brought them inside for a table centerpiece.  I'm lousy at flower arranging but I do love bringing flowers indoor to enjoy.  I used some hosta leaves as the background greenery for my "arrangement."  (Arrangement = I stuck the flowers in a vase.  Done!)

I was looking for a solution or some way to help make the flowers last longer and I discovered a Youtube video specifically talking about keeping hydrangea looking fresh indoors for a longer time.  I made up "the recipe" solution and I must say, the hydrangea, roses and even the zinneas I picked on Monday still look as good as the day I cut them.   Here is the recipe for keeping flowers fresh longer:
1 Quart warm water
1 Teaspoon white vinegar
1 Teaspoon mouthwash
1 Tablespoon sugar
4 drops dishwashing liquid

Combine in a one quart jar, mix it up and fill the vase 1/3 to 1/2 full with the solution and the rest of the way up with clear water.  That's it and it really seems to be working well.  I now keep a jar of it mixed in my pantry (labeled, of course) and have it ready to feed the flowers in their vases.
Now it is time for me to get back outside and weed the vegetable garden.  If nothing else, I sure can grow healthy weeds!

Until next time,
Cheers!

Jennifer