Tuesday, July 27, 2010

A mare and her foal


This is another of my favorite horse stamps. It is from the Stampin' Up! set titled BAREBACK. This set was retired several years ago and I was very pleased when I had the opportunity to buy it from someone who no longer wanted it.

My husband frequently reminds me that I do not need to use every embellishment available on a single card. "Remember," he says, "less is more." I know. I know. But I wanted to try out a mixture of Flower Soft product for the grass and wild flowers. And I just had to add a bit of raffia. And I like to sew on cards and add photo corners and don't you think burnished brass brads give it a western look? Hmmmm....maybe I need embellishment intervention. Hee hee hee!

Card Recipe:
Stamps: Stampin' Up! Bareback
Paper: My Mind's Eye patterned paper and Stampin' Up! Cardstock
Ink: Memento Tuxedo Black, Tim Holtz Distress inks in Vintage Photo and Peeled Paint and Whispers Archival Whisper Blue
Embellishements: Nestibilities rectangle dies, EK Success paper shaper photo corner punch, Machine stitching, MM brads, raffia, Flower Soft, and image colored with Copic Markers.

This card is actually a reprisal of a card I made a couple years ago almost identical so if you vaguely recall it, it is similar, though not identical. I think this image begs to be watercolored so next time I will do that.

Cheers!

Jennifer

Thursday, July 22, 2010

Fruit Jams: not just for P, B and J sandwiches anymore

Have you been harvesting from your garden or shopping your local farmer's market for fresh fruits and vegetables? As soon as my favorite fruit farm opened with this summer's bounty I headed straight over to stock up on my supply of fresh fruits and vegetables to makes jams and pies as well as to freeze for the winter as much as we weren't able to consume now.
One of the first things I made was my very favorite recipe for Raspberry and Strawberry jams. Once the canning process was complete I wanted some labels for my jars so I can present some as gifts. SERENDIPITY STAMPS has a new canning jar stamps that I thought fit the bill perfectly. You can find this stamp at Serendipity stamps HERE. I stamped the image, added a few touches of color with Copic markers and Stickles glitter and then used my Nestibilities oval and scalloped oval dies to cut out and tie to the jar with some kitchen twine.
I made Raspberry and Strawberry jams.
What? You say you aren't a fan of jam? But jam is not just for peanut butter and jam sandwiches. Oh no! My yummy raspberry jam makes a perfect spread and topping on brie and crackers. Brie and raspberry spread: a delicious treat for a hot summer afternoon treat. My strawberry jam is also excellent on brei or any soft cheese but I do admit that raspberry is my favorite.
I will also admit that I do love to have a good old fashioned peanut butter and strawberry jam sandwich. Yummmmm.

So with my bounty of fruits from the local fruit market I headed home ...
... and brought up the canning jars and lids from the basement. Next, I washed them thoroughly and sterilized the jars.
Does the big, black enamel canning pot intimidate you and make you equate it with W+O+R+K ?
Don't let it. It is really fun to can and quite easy too. It isn't something only your mother and grandmother did. Give it a try and you'll be happy you did.
So after you've prepared your jars by cleaning and sterilizing them it is time to cook the fruit. If our computers allowed you to smell the aromas from the photos you'd be smelling the most wonderful raspberry scent filling your senses. Oh it is heavenly! Truly!
My recipe for jams is an old fashioned jam that does not require you to use pectin. Though adding pectin does aid in the process of jams to "gel" it is not required for a jam to gell up. In fact, if you add pectin you probably need to add more sugar to your recipe which diminishes the intense fruit flavor a bit. So after boiling the raspberries and sugar you are soon ready to fill the jars and place them in the hot water bath method of canning. Just be sure you do NOT boil the sugar and fruit any longer than 6 minutes. If you do, once your jam is finished it will be more like gummy fruit candy rather than jam. Another indication that you do not need to add pectins.
In a few short minutes the jars are processed and you remove them, allow them to seal and cool off undisturbed for 24 hours. Then you are ready to label and store and enjoy the fruit in the year to come.
The recipe makes six or seven 1/2 pint jars. I made both Raspberry and Strawberry jams.

Would you like to give it a try? Here is the recipe I use for what I consider to be the best homemade fruit spread:

Raspberry Jam

4 cups (1 liter) granulated sugar
4 cups (1 liter) raspberries


1. Place sugar in an ovenproof shallow pan and warm in a 250°F (120°C) oven for 15 minutes. (Warm sugar dissolves better.)
2. Place berries in a large stainless steel or enamel saucepan. Bring to a full boil over high heat, mashing berries with a potato masher as they heat. Boil hard for 1 minute, stirring constantly.
3. Add warm sugar, return to a boil, and boil until mixture will form a gel, about 5 minutes.
4. Ladle into sterilized jars and process for 10 minutes.

NOTE: I think the tip in the first step, i.e. to warm the sugar first, really is very helpful in the process for the sugar to dissolve better.

I'm going to enjoy the plate of brie and raspberry jam now. It has been waiting for me to finish typing this post and it is calling my name!

Cheers!

Jennifer

Sunday, July 11, 2010

Cherries, Cupcakes and Mary Engelbreit

You might be wondering what cherries and cupcakes and Mary Englebreit have in common. I recently joined another of the "Flirty Apron Swaps" and the theme for this swap was to create for your secret partner a package that would incorporate each of the items of the theme, i.e. it must include something with cupcakes, cherries and Mary Engelbreit.

For the apron I created for my partner I used this wonderful cherry print fabric and used a contrasting red dotted fabric for the pocket. So sorry my photos look so washed out. I hurriedly took the pictures in the bright morning sunlight so I could get my package in the mail that day and the bright sun makes this yellow appear very pale when in fact it is a sunny yellow and bright red. I wished I'd made myself the same apron because this fabric is just so sweet, but alas, I did not buy enough fabric for a second apron (though in a few posts back you'll see that I made a pin cushion with some of the scraps.)

A closer look at the contrasting pocket. Frequently I like to use rick rack on aprons but not this time. This apron just seemed to NEED to be trimmed in eyelet and I love the soft, feminine look of the eyelet edging all around the apron and pocket edge.

So, you say, fine. I see cherries but where are the cupcakes and Mary Engelbreit? Well, we always include what has become known as "tuck ins" in our apron swaps. So my tuckins to my partner along with her apron are in the above photo. I had some Mary Engelbreit jellyroll fabric strips so I used the fabric strips on some terrycloth fabric I had and edged them for my partner as hand or fingertip towel. I also made her the set of note cards using a Mary Engelbreit stamp I have. And now for the cupcake inclosures I made the cupcake pincushion, which you've seen in a previous post. And also included some Mary Engelbreit cupcake paper liners.

So this was my surprise package for my secret partner that I put together for her of the apron and the tuck ins, all in the theme of cherries, cupcakes and Mary Engelbreit. I hope she'll enjoy the package. I should be receiving a package in the coming week from a secret partner who'd been given my name to create a package. These swaps are such fun...to receive handmade items from strangers around the globe, all in the name of love of aprons and fun.

Cheers!

Jennifer

Thursday, July 8, 2010

Bicycle Basket Liner


I live in a small village. The library is about 4 blocks away. The grocery store is about two blocks from my house. We do not have home mail delivery, but instead, must go to the post office daily to check the mail. It seems senseless to me to waste gasoline to drive to these places. And one of the benefits of living in a small town is everything is close by AND I need the exercise.


And even though my old, beatup bicycle has a basket, things would bounce and fly out or I'd run the risk of loosing my keys if I'd hit a bump. I've seen some lovely bicycle basket liners for sale online. They also come with quite a big price tag so I thought I'd give it a go to create my own bicycle basket liner that would double as a shopping bag and have all of the features I would need to keep my purchases, mail or books neatly in place.
My bike isn't a fancy or expensive cruiser and I'm afraid too that the basket has taken a bit of wear and tear over the years so I wanted my liner to be frilly and feminine and pretty!
And this is the liner I created. I am considering replacing the bow with a big flower. I'll update if I do indeed do that.
While the size of the basket would seem to limit the space of my bag, it didn't really. The gathers allow for expansion so that when I remove the liner at my destination and pick up the handles, you can see it is quite a room and very sturdy bag. I've used heavy weight interfacing to give my liner heft and durability.

The handles lay neatly inside the liner while riding...

...but easily lift up to carry once you are ready to take it with you.

And now for the details. The criteria for my bicycle basket liner was that I did not want to have to carry a purse too so I'd need my liner to be able to carry my wallet, cell phone, library card and my keys in a secure manner so that they couldn't bounce out while riding. The zippered pouch is big enough to hold my oversized wallet. And the snap clip/hook will securely hold my keys to the house and our mailbox without the risk of them bouncing out of the bag.

I wanted the hardware but I wanted it to be feminine and flowery and frilly too. The fabric store carries the handle webbing in a huge variety of colors. I happened to have this pink webbing in my sewing supplies and it worked out perfectly.

Another criteria when I set about making this project was that I refused to go out and purchase anything at all for it. I used all fabrics, interfacing, zipper, button, lace and webbing from my home supplies. Afterall, I'm making an effort to conserve, reuse and save money and energy so I didn't want to invest in something that was supposed to be cost efficient.

So here she is! My very own bicycle basket liner. It really was NOT difficult to make at all. In creating and sewing it, I worked backwards in its construction, visualizing the final product and imagining how it would need to be sewn with each step.

I just bought some beautiful raspberries and strawberries and rhubarb from the local fruit market. Wouldn't you know it? I realized that my jam jars don't have any new lids, so I'm off on my bicycle for a fast trip to the store so I can put up some jams and preserves today with my fresh yummy fruit.

Cheers!

Jennifer

Monday, July 5, 2010

Daisy Jar

I was quite surprised to read last week that the rubber stamp company called Cornish Heritage Farms is going to be selling the business. I surely do hope they find a buyer who'll maintain the quality and beauty of stamps and excellent customer service that the current owners have always maintained.

It was just by chance that I made this card prior to reading about the impending for sale sign being put up. This daisy jar stamp, a Cornish Heritage Farm stamp, is the perfect summertime stamp for many occasions.

For this card I pulled out my twinkling H2O's that have not had their little lids removed from them in ages. There is very little coloring needed on this simple card. Next I filled in the centers of the daisys with teeny-tiny micro beads. The daisy petals are covered with a bit of yellow Flower Soft product. Finally, before assembling the card I used my cuttlebug swiss dots embossing folder for the background and the corner designs are also using cuttlebug corner dies for cutting. A little jute tied in a bow around the vase and the card is complete.


Thanks for dropping by today. I hope you are enjoying a wonderful summer (or winter if you are living down under).

Cheers!

Jennifer

Sunday, July 4, 2010

A cheery cherry cupcake pincushion

The high calorie cupcake pincushion that I made and showed you yesterday was given away as a gift and I was so pleased with it and definitely in need of a new pincushion for myself that I whipped up a second pincushion that I have dubed as my CHEERY CHERRY CUPCAKE PINCUSHION.
This fat pincushion is extra large and weighty and for the serious seamstress/quilter/sewing crafter you'll love design. I found the pattern at Sandi Henderson's online shop at Portabello Pixie
There are many ways for you to personalize your cupcake pincushion. The top button detail could also be done with yoyo circles, fancier buttons and even handmade fabric roses. I chose to use my cuttlebug with one of my nestibilities flower dies and cut a yellow flower from a piece of felt. Then I went though my button jar looking for the perfect match to the fabric red. VOILA! I created the flower/button top.

As you see, my pincushion is resting on my cutting table and is ready for some heavy duty use today. I'm working on a new pattern for my bicycle basket that will convert my black metal basket into a feminine and frilly basket liner that will double as a carry all once I arrive at the post office, the grocery store or the library.

Are you intrigued? I hope so. I'm excited about this next project.

And if you are reading this on July 4th (today) I wish all of my family and friends in the United States of America a very HAPPY INDEPENDENCE DAY!

Cheers!

Jennifer

Saturday, July 3, 2010

Cupcake Pincushion

Isn't it fun how the lowly cupcake, a treat that was once relegated as the go to treat for children's birthday parties or school treat has, over the past couple of years, become the "IN" dessert? Cupcake towers, wedding cupcakes (in lieu of the traditional cake), cupcake cookbooks, designer cupcake papers...the list goes on and on. And not only are cupcakes the new "in" dessert, the image of the cupcake can be found on fabric and in pattern designs.

The cupcake has found its way to my sewing room too, as this week I made a cupcake pincushion. And let me tell you, this is one very high calorie pin cushion measuring approximately 6 inches wide and tall! I love this cushion. Its size and heft will hold down tissue patterns from flying off your table, you aren't hunting for your pin box or in risk of spilling pins everywhere and it is such a cheerful addition to your sewing notions.

The pattern I used for this pin cushion is from Portabellopixie Patterns and is a Sandi Henderson design. It was extremely fast and easy to whip up. In fact, so easy that inbetween cooking pasta and making a salad I cut out and began assembling parts of a second pincushion last night. (The one pictured here has been given away as a gift already.) For the fabric you can easily use scraps of coordinating fabric. For the pin cushion shown, I used some coordinating Moda fat quarters.

I should mention too that the pattern comes in a "high calorie" pin cushion design as well as a "low calorie" design for those who don't want or need quite as large of a pincushion.

My pin cushion has put me in the mood for a cupcake or two, so before the day gets hot I think I'll go do a little cupcake baking now.

Cheers!

Jennifer

Wednesday, June 30, 2010

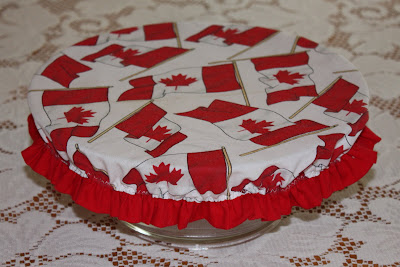
North American Holiday Weekend Picnic Bowl Covers

Beginning tomorrow, July 1st, and extending through Sunday, July 4th, it is North America's traditional celebratory holiday picnic weekend. In Canada we celebrate CANADA DAY on July 1st and in the United States of America on July 4th we celebrate INDEPENDENCE DAY. Both holidays are celebrated much the same way and that includes picnics!

I may be dating myself but I have to ask you if you remember your mother and grandmothers using the elastic bowl covers? Back in the 50's and 60's every household had the ubiquitous bowl covers that were plastic with elastic around the edges. They also doubled as shower caps in a pinch. Then came the advent of plastic wrap on rolls and tupperware lids that would "burp" when sealed. No longer do we see the old fashioned bowl covers. But if you get tired of filling land fills with plastic wrap and want to cover your bowls with some fashion, fun and flair I have a very fast project for you to take to your next picnic.

These fun bowl covers take just minutes to create. They are completely washable so no more plastic in the land fills.

How fun it will be to arrive at your next picnic, church potluck or family reunion carrying your favorite pie, potato salad or bowl of snack food covered in a stylish top. It will keep the flies off your yummy treats until the feasting begins.
Since my household is a joint Canadian and American household I wanted to make sure our bowls were covered in dual citizenship flags.

I know...you are probably thinking to yourself, "But Jennifer, they aren't airtight." That is true, but they will keep the bugs and flies away from your food, they are ecologically friendly and they are just too cute. Come on...you know it's fun to add a splash of Canadiana and/or Americana to your table setting.

So if you are interested in spending 30 minutes making a set of these they are as easy as pie to create. Trace directly onto the wrong side of your fabric around the top of your bowls, cake pans, pie plates...any serving bowls you wish to use. Then add an extra two inches to that circumference and cut it out. Grab a contrasting or complimentary colored double fold bias tape and sew it to the raw edge of the circle. Instead of bias tape I made a very fast ruffle. They both serve the same purpose in adding an edge. Last step: (see, it is almost finished already) on the inside edge of your ruffle or bias tape, zigzag stitch 1/4" elastic being sure to pull and stretch it as you stitch. THAT'S IT! You are finished.

Just think of how fun these covers can be for other holidays (Halloween popcorn bowls and Christmas party covers using seasonal fabric.) Or perhaps make yourself a set complimenting your kitchen decor and colors.
As you can see my bowls are empty so I need to get into the kitchen and get busy making our picnic food.

I'm wishing you a happy and festive holiday weekend whether you are celebrating Canada Day tomorrow or Independence Day on Sunday.

Cheers!

Jennifer

Tuesday, June 29, 2010

Garden Glove

In keeping with the theme of my garden and the ground hog that is welcoming himself to a smorgasbord of vegetables, I made this thank you card for a gardening friend of mine who has a wonderful garden of her own and I do not think she's plagued by ground hogs.

Card Recipe:

Stamps: The Thank you sentiment and floral garden glove are from Serendipity Stamps
Ink: Image stamped with Momento Tuxedo Black and image colored with Copic Markers
Paper: The plaid background paper is from Michaels (manufacturer unknown)
Accessories: Stickles, Machine stitching Nestibilities dies, ribbon from my stash

Now tell me if you notice something very odd and done incorrectly about this card. YIKES! I don't know where my mind has gone. Do you see my error? I'm hoping not, but I'm sure someone will pick up on it.

Thanks for dropping by.

Jennifer

UPDATE: Several people asked what I was talking about it wrong. I mounted the image upside down. YIKES! The flowers are supposed to be growing out of the glove sleeve. I was so intent on lining up the image straight that I didn't look to see that I was holding it upside down. And let me tell you, when they say the glue is permanent...it is!

The garden and the groundhog

Here he is. Meet Mr. Groundhog. He and I have been doing battle ever since I planted my vegetable garden. He's out there and is waiting for me to replant more vegetables for him to consume. He is my arch enemy number one: Mr. Groundhog

He sits and waits in the grass, thinking I don't see him. He's wrong! There you are Mr. Groundhog!


Some days, just to add insult to injury, Mr. Groundhog waves and says, what are you going to plant for me to eat today?


This WAS going to be one of my broccoli plants. He didn't even wait for the delicious, green vegetable to mature before destroying all of my plants. I replanted. He ate them all again.

And this was supposed to grow into delicious cucumbers. HA! Not a chance now. So I replanted. And again he feasted..........

Sometimes he just waddles around in the tall grasses in the field behind our back fence...waiting.....watching.

With a fully belly he waves goodbye to take a nap in his hole. Just waiting for his next meal.

Saturday, June 26, 2010

Roly Poly Daisy Girl

Isn't she just a hoot? This is one of three Roly Polys, created by Sunshine Designs and manufactured at The Stamp Barn, that I bought a year ago. I just think they are just the most fun quasi-children images.

See the ladybug on her leg?

Card Recipe:

Stamp: CSD079L Roly Poly by Sunshine Designs (THE STAMP BARN)
Paper: Cardstock is Stampin' Up! Designer Paper is K & Company
Ink: Momento Tuxedo Black. Image colored with Copic Markers
Accessories: Nestibilities daisy flower die, jute, gold faux gemstone, stickles, foam tape

I hope you are having a fun filled, sunshiney, lazy-daisy kind of summer weekend.

Cheers!

Jennifer