Monday, January 16, 2012

All Black and White House Mouse and Friends Challenge # 111

Are you ready for a new House Mouse and Friends Monday Challenge? If so, you'll want to head on over to House Mouse and Friends Monday Challenge Blog for challenge #111 for the "ALL BLACK AND WHITE ONLY" Challenge.Sounds simple, eh? Well, technically it is but let me tell you how hard it was not to add color to the cute little mousie. Not wanting to buck the rules on my first challenge with the DT I managed to keep my card all black and white, though I admit to using my copic markers just a wee bit on the mouse using cool grey tones.
And...I tried out my brand new-to-me lacey oval die from Cheery Lynn Designs. I've been seeing so many new intriquite die cuts on cards lately and I just had to try one out. It is a bit trickier running these delicate die patterns through the cuttlebug but the end product is lovely, I think.

I used some black Stickles glitter and on top of the stickles used clear Glossy Accents dimensional glaze on the ink bottle for a real life ink jar effect.

Card Recipe:
Stamps: Stampabilities "Amanda Writes" and Papertrey Inc "hello" sentiment
Ink: Versafine Black and clear embossing powder. Copic Markers
Designer Paper: Making Memories "Sabrina"
Embellishments: Cherry Lynn Designs cutting dye, Prima Flowers, Miscellaneous black buttons and machine stitching


Be sure to hop on over and join in on today's House Mouse and Friends Monday challenge #111. As always, there are super prizes to be won and gorgeous sample cards for inspiration from the amazing House Mouse and Friends design team.

Also, I wanted to tell you to Mark your calendars for January 30th. It's the day of our very first BLOG-HOP of 2012 !! You will want to join in the FUN and play along on that special challenge too because it will be FULL of excitement and really GREAT PRIZES!!

Until next time,
Cheers!

Jennifer

Friday, January 13, 2012

One stamp - three ways

Day #4 of the CAS online cardmaking class covered some very interesting ideas for using one stamp in a variety of ways and still create clean and simple cards.

I decided to use a Serendipity Stamps set and use the tennis shoes three different. My first card I used a layout from Day #1 lesson and a very old but loved sentiment stamp from JustJohanna stamps that says You have a certain je ne sais quoi. I have a very limited French vocabulary but this is one sentiment that I just love and it suites so many occasions so I thought I'd play it out on this tennis shoe card. I colored the shoes with copic markers except for the center tennis shoe on which I used some paper piecing to match the sidestrip background.
For my second card I used the friends synonyms words stamp from the set and stamped it over and over in versamark and embossed with white detail embossing powder to create the background. Then I simply stamped the shoes on a scratch piece of cardstock in versamark and embossed it in white detail embossing powder and colored the strings with white gel pen. To make the shoes pop a bit I cut them out and mounted them on foam tape, then added grosgrain ribbon bows to the corners. Voila! Card #2 complete! (Oh my...French written twice in one post. I am about at my limit now.)
Card #3 is a really BRIGHT card even though it is on black cardstock. I stamped only a portion of the tennis shoe stamp one a piece of cardstock and then embossed it with the fushia embossing powder. I rarely use this EP and now that I see how bright and fun it is on black cardstock I may have to use it more often. I tied some bright green grosgrain ribbon around that piece of cardstock and mounted it to the cardbase. Then I stamped Friends Forever from the Serendipity Tennis Shoe set in versamark and embossed in white. The card was kind of flat looking so I colored the shoe strings in white gel pen and added faux stitching with the gel pen too. (WHAT?! Faux...French three times in one post! That really is about the extent I know now!)

This is the Serendipity Stamp set I used and made three different cards keeping them CAS.

Time to go outside and help the Mister shovel snow. We got hit really hard here in Eastern Ontario.

Until next time,
Cheers!

Jennifer

Thursday, January 12, 2012

Tickled PINK and on Cloud Nine


Yes, that's right!  I'm tickled pink and floating on Cloud Nine!  I received an invitation from House Mouse and Friends Monday Challenge Blog to be a permanent designer on their design team! Five new Design Team members were chosen to join this international and fabulously talented House Mouse and Friends Monday Challenge Blog and I can't begin to tell you what an honor it is for me to have been selected as one of the five new design team members.

As you know, House Mouse & Friends Monday Challenge is a bi-Weekly Challenge Blog that posts a new Challenge to the HM&F MC blog every other Monday. It is a Family oriented TEAM who work together to run it as a real group. The Members are Designers from around the globe that have a broad range of talents, interests and a great love for the adorable House-Mouse & Friends, Gruffies & Happy Hoppers Stamps from House Mouse Designs.

Thanks for allowing me to Toot! Toot! Toot! my own horn but I just have been tickled pink, floating on cloud nine and grinning from ear to ear since I received the news.

Cheers!

Jennifer

Wednesday, January 11, 2012

Tone on tone pennant birthday card

It is day #3 of the online card making class and today we focused on tone-on-tone dimensional cards. It is still clean and simple in design, but the dimension from the punched pennants and the Happy Birthday banner give this otherwise monochromatic card a bit of pop.

Card Recipe:
Stamps: Sentiment is from Papertrey Inc. Mixed Messages set
Ink: Momento Rose Red
Accessories: Stampin' Up! Pennant punch, cuttlebug swiss dots embossing folder, DMC E5200 Pearlescent Effects embroidery floss, half pearls


I bought myself a Crockpot last month and have been having fun trying out new to me recipes in it. Tonight I have Chicken Breasts A' L'Orange in it. If it turns out to our liking I'll share the recipe tomorrow. It was easy to throw in the crockpot this morning and the orange and spices in it are really starting to smell delicious this afternoon as it cooks.

Until next time,
Cheers!

Jennifer

Tuesday, January 10, 2012

One layer card: Golden Doilies

Today is Day #2 of the Clean and Simple Cards at the online card making class that I'm taking. Today's lesson was Perfectly Flat cards, or as are often referred to as OLC's (One Layer Cards).

Whew! Not a button, ribbon, pearl or brad added, but I did it! Knowing me as he does, even The Mister commented tonight that this must be difficult for me! tee hee hee! He's right, it is! But I'm thoroughly enjoying the course.

Card Recipe:
Stamps: Stampin' Up! Hello Doily, Delicate Doilies and Wonderful Words
Ink: Brilliance Galaxy Gold and Versafine Vintage Sepia
Accessories: Gold Leaf pen and Martha Stewart eyelet border punch


So here is my OLC in CAS fashion! Are you learning the lingo along with me? I'm looking forward to seeing what our next lesson will be as well as making more cards from Days 1 and 2 from lessons we are learning.

Cheers!
Jennifer

Monday, January 9, 2012

Clean and Simple: Dog Sympathy Card


For the next few weeks I'm taking an online cardmaking course on Clean and Simple cards, otherwise known as CAS Cards. It seems a bit strange that the hardest cards to make, at least for me, are the clean and simple ones. Oh yes! I can layer onto one card just about every embellishment, glitter and glitz I have, but challenge me to use only cardstock, stamp and ink with blank spots showing...YIKES! I panic.

Today was the first demonstration of sample layouts and cards with an excellent video and samples. I just know I'm going to thoroughly enjoy this course.

My card uses the first layout we were assigned. Because I make and send sympathy cards for loss of pets, I decided to use a dog sympathy card as my focal point.

Card recipe:
Stamps: Cornish Heritage Farms Dog Backgrounder, Papertrey Ink Sentiment, Paw print from Clear Stamps.
Ink: Memento Bamboo Leaves, Versamark and detail white embossing powder
Supplies: White gel pen and foam dots.


If you are interested in online card making courses, go to: On Line Cardmaking.

Cheers!

Jennifer

Sunday, January 8, 2012

New Year and New Projects

It's a NEW YEAR and the first theme challenge at House Mouse and Friends Monday Challenge blog is "NEW". Get out your Mouse Mouse, Happy Hopper or Gruffies stamps and create something with the theme of NEW. I have some new sewing projects I am dreaming up and some actually sewn since the 1st of 2012, so I decided to use this cute House Mouse Stamp titled "Alterations Sew and Go" as my take on the theme for all of my new sewing projects underway.
For the inside of my card I used a sentiment from Paper Trey Inc. Quilters Sampler Sentiments.

Card Recipe:
Stamps: Stampabilities "Alterations Sew and Go" and Papertrey Inc. "Quilters Sampler Sentiments
Ink: Momento Tuxedo Black and Versfine Crimson Red. Image colored with Copic Markers
Designer Paper: Cosmo Cricket
Embellishments: Red, Yellow, Green and Blue Stickles Glitter for the pinheads, Antique Glass Embossing glaze on the mirror, Machine stitching, satin measuring tape ribbon, black buttons, scissors charms, and gold, green and blue glitter gel pens.

Do you have NEW things you are doing, working on, reading, playing, activities (the list could go on and on) that you are pursuing this new year? I'd love to hear.

Until next time,
Cheers!

Jennifer

Sunday, January 1, 2012

Happy New Year and Black Beauty too!


HAPPY NEW YEAR!!

How did you spend New Year's Eve? I'd love to hear how everyone celebrates the "going out with the old and in with the new." The mister and I had a very low key evening but pleasant enough. We watched a movie and were in bed before midnight. Yep! That's us...the party animals.

I'm a person who likes to make lists. A LOT of lists for all kinds of things. Consequently, I've been making my goals lists for 2012. My list is lengthy so rather than bore you with the mundane, I'll share just two of my goals.

One goal is to read 40 books this year. Last year I challenged myself to read 100 books. I read extremely slowly so this was truly an unrealistic goal. I cut it back to 40 books which is still going to be a very full challenge for me. I belong to GOODREADS, a website for both the bibliophile as well as those of us who enjoy a good read. Goodreads has online reading clubs and I've joined one. The bookclub has a challenge for us this year. We each listed 12 books that have been on our "to read" list and to pick one book from that list each month. This is my list of my "book of the month reading list":

Black Beauty by Anna Sewell
Christmas on Ladybug Farm: A Novella by Donna Ball
The Eighty-Dollar Champion: Snowman, the Horse That Inspired a Nation by Elizabeth Letts
Letters From Home by Kristina McMorris
Midwives by Chris Bohjalian
The Thirteenth Tale by Diane Setterfield
The Pillars of the Earth by Ken Follett
Astrid and Veronika by Linda Olsson
The Story of Edgar Sawtelle by David Wroblewski
Miss Peregrine's Home for Peculiar Children by Ransom Riggs
The Night Circus by Erin Morgenstern
The Guernsey Literary and Potato Peel Pie Society by Annie Barrows

I own all of these books. Many I've even started but have not finished. Notice the first book on my list is Black Beauty by Anna Sewell. Last summer my daughter gave me a box of old books that had been mine and she had borrowed. Amongst the books was a copy of Black Beauty that had been given to me by my Uncle Jack when I was about 9 or 10 years old. I loved the idea of owning the book and leafing through it but I had a very difficult time reading as a child and consequently, never read it. But, I kept it all of these years! Now I'm finally going to read it and I know I'm going to love it.
Black Beauty
Black Beauty

That's just one of my goals, i.e. to read 40 books this year and the above list will be 12 of that 40. I'm keeping a ticker down my sidebar to chart my progress as the year goes by.

Another HUGE and very important goal, to which I'm seriously committed, is to lose weight. 76 pounds of weight! I won't bore you with the updates on my weight loss journey, but I have also put a ticker graph on my sidebar for my own information to chart the loss as the pounds come off. I know it won't be easy, but as I said to the mister, I have too many big plans for the future and as I approach turning 60 years young, I do not want my weight literally weighing me down. So I suppose the age factor is what jolted me into action. I turn 60 in 2 years. First I need to get this weigh off, which I should be able to accomplish in a year and the then continue to get in shape mentally and physically so that by the big 60 I'll be ready and healthy enough to get on with our plans for the mister's retirement.

Speaking (indirectly) of healthy things to eat, have you ever heard of or eaten JAZZ apples?

Jazz is a relatively new apple variety from New Zealand. It is the result of a cross between Royal Gala and Braeburn. We've only just discovered this variety in the last two month and they are absolutely delicious! They're crisp, sweet and...well...we love them. If you haven't tried them and happen to see them at your grocery store or market, I encourage you to give them a try.

Again, I wish you a happy start to the new year and throughout the year as well.
Cheers!

Jennifer

Saturday, December 31, 2011

"The wind of heaven..."

These past several days between Christmas and New Year's day have been relaxing for the mister, the critters and me. We've puttered about doing hobby things, a bit of organization projects are in progress and we've taken in a couple of movies at the cinema. One that I highly recommend if you get a chance is to go and see War Horse. The cinematography, history about WWI and of course the story of Joey, the war horse, makes for a fascinating movie(albeit very emotional - tissue alert).


After seeing the movie I decided to make some notecards for my own use and used the Bareback set from Stampin' Up! The paper piercing was done with a Spellbinders piercing template and stylist. I love the simple yet textural feel of paper piercing.
I love the sentiment that goes with the which reads, The wind of heaven is that which blows between a horse's ears. and stamped it on the inside of my cards.


Card Recipe:
Stamps: Stampin' Up! Bareback set
Ink: Versafine Vintage Sepia and Stampin' Up! Chocolate Chip
Designer Paper: October Afternoon
Embellishments: Nestibilities rectangle and scalloped rectangle dies, Spellbinders piercing template, machine stitching, jute, Brass hardware from Making Memories.

Do you have big plans for New Year's eve? Do you go out and ring in the New Year with friends? Gabe has gotten a jump start on the way the mister and I party. We are pretty laid back and will most likely toast the New Year around 10 p.m. and then be off to bed. I can't stay awake anymore until midnight. Obviously, neither can Gabe!


Happy New Year, my friends!
Cheers!

Jennifer

Friday, December 30, 2011

Fuzzy and Warm


"Fuzzy and Warm" is the theme for the final challenge #109 at House Mouse and Friends Monday Challenge blog. I'm getting my card made just under the wire for the deadline, but I really had fun making this card. I used one of my Happy Hopper stamps titled Will Knit for Friends. I think this sweet stamp refects the fuzzy and warm challenge requirements.

My chicks are adored with some fuzzy down by using Flowersoft product on them.

The inside of my card is stamped with "Hello Chickie". Hopefully the recipient will get a smile or two from this card.

Card Recipe:
Stamps: Stampabilities Happy Hopper "Will Knit for Friends" and Papertrey Ink sentiment
Ink: Momento Tuxedo Black and Momento Rose Bud. Image colored with Copic Markers
Designer Paper: Stampin' Up!
Embellishments: Martha Stewart Eyelet Border Punch and Stampin' Up! Doily Punch, Yellow Flowersoft product, pale green, yellow and purple half pearls, Machine stitching.

Another fun House Mouse and Friends challenge will be posted on Monday, Jan. 2nd so if you don't get in on this challenge, be sure to check out their blog next week.

Cheers!
Jennifer

Thursday, December 29, 2011

Time's fun when you're having flies...


Winter most definitely has arrived. We've had a lot of snow over the past week and today the temperature has dipped to 4 below zero...and that doesn't even take in to account the wind chill factor. Suffice to say, it was C+O+L+D outside and a good day to stay inside and putter about. While the Mister worked on some automotive tinkering, I decided to make cards.

Cards for the fellows are always hardest for me to make. This stamp set called Frogs and Flies is a retired set from Stampin' Up! and you've seen me use it before. I think this fun little frog with his jar of pickled flies is a hoot and hopefully the man I'm sending this card to will think it is too.

Card Recipe:
Stamps: "Frogs and Flies" Stampin' Up!
Ink: Momento Tuxedo Black and Momento Bamboo Shoots (green). Image Colored with Copic Markers
Designer Paper: K & Company
Embellishments: Stampin' Up! Corner punch and flower punch, Stickles glitter glue, Making Memories (I think!)dragon fly brads.

Until next time,
Cheers!

Jennifer

Sunday, December 25, 2011

Merry Christmas!


From our home to yours The Mister, Gypsy, Gabriel, Noah, Paige, Tango, Renoir and especially I wish you and your family a very happiest of holiday seasons filled with love, peace and laughter.

Cheers!

Jennifer

Wednesday, December 21, 2011

Christmas Baking

What did I get myself into? I told The Mister that I'd put together some simple gifts for him to take to his staff at work. Last summer I did so much canning and preserving I thought I'd give out jars of jam and preserves. Well, as usual, I over think things and decided a jar of jam didn't seem quite right so I decided to make up a plate of baked goodies surrounding the jam.
This is what I came up with. I made 7 different kinds of cookies (pictured above). The only baked goodie that I didn't share are the peanut butter/chocolate balls. The Mister loves those so much so I saved them for him. But I did do a lot of baking!! A LOT of baking. All of the cookies are family traditional Christmas cookies with the exception of two new recipes: the Chai Chocolate Snickerdoodles (that I posted about the last post) and the Cherry Bowties. OH MY GOODNESS! The Cherry Bowties recipe is a new one this year and we love them! I used my homemade cherry jam inside them. This is definitely a keeper recipe.

I used my Michael's 50% off coupon on rolls of shrink wrap and tied up the plates with ribbon. The tag is made from a Stampin' Up! set called "Deck The Halls".

And so......14 gift plates later, I finally finished packaging the gifts. The Mister will take the gifts in with him to work tomorrow to distribute to his staff.

And don't you just know it? After all of the baking I've done, we now do not have any cookies left. Well, none in the photos above. Just his peanut butter balls now. That's fine with me.

Until next time,
Cheers!

Jennifer

Monday, December 19, 2011

Chai - Chocolate Snickerdoodles

For me, Christmas is all about family traditions. These traditions extend from how we celebrate the Holy day, how we prepare and decorate, and how and what we bake and eat. On December 1st I have been donning my favorite Christmas aprons (future post will be my aprons) and baking a variety of family favorite cookies, pies and cakes. Many of my cookies are the traditional ones that many people bake such as Spritz cookies, Mexican Wedding Cookies, Fudge and jam/fruit filled cookies.
This year I tried a couple of new cookies to add to my holiday baking repertoire and today I want to share Chai - Chocolate Snickerdoodles. I discovered this recipe last year while watching ABC's Good Morning America and went to their website, printed it out but did not make them until I rediscovered my recipe yesterday. These are most definitely going to remain on my annual Christmas cookie favorite list!

My childhood memories of delicious cookies included Snickerdoodles. They are among my favorite cookies. I also love Chai! Years ago a dear friend made for me my first cup of real chai. It seemed to me that he was going to a lot of trouble just to make a cup of tea, but one sip was all it took for me to be a chai drinker. This recipe for Chai-Chocolate Snickerdoodles is a cookie version of my favorite beverage. The key ingredients include ginger, cinnamon, cardamom, all spice, white pepper and vanilla: all of those wonderful flavors found in Chai! And the addition of some cocoa powder adds a hint of chocolate. Yummm!

This is the recipe:

Chai - Chocolate Snickerdoodles
Ingredients:

2 1/4 cups sugar
1 teaspoon ground cinnamon
1 teaspoon ground ginger
1 teaspoon ground cardamom
1/2 teaspoon ground allspice
1/2 teaspoon white pepper
1/2 cup unsweetened cocoa powder
1 cup softened unsalted butter
2 eggs
2 teaspoons vanilla extract
2 1/4 cups flour
1 1/2 teaspoons baking powder

Baking Directions:

Preheat oven to 350 degrees.

Combine the first six ingredients (sugar through white pepper) in a small bowl; reserve 1/2 cup in a shallow dish for rolling the cookies in right before baking. Add cocoa to the small bowl with remaining sugar/spice mixture. Stir to blend.

Cream butter with an electric mixer until fluffy. Add the spiced cocoa mixture and beat until combined. Add eggs and vanilla, then add flour and baking powder, mixing at low speed until combined.

Roll dough into tablespoon-sized balls. Roll balls in reserved sugar mixture and arrange 2 inches apart on parchment-lined baking sheets. Bake at 350 degrees for 12-15 minutes.

Cool on sheet pan for two minutes before transferring to a wire rack to cool completely.

This recipe was styled by chef Karen Pickus for Good Morning America.

If you'd like to see the video from Good Morning America's program click HERE.

I know you'll enjoy these!

Cheers!

Jennifer

Friday, November 25, 2011

Christmas Poinsettia


I gave myself a challenge today. I am way behind in making my Christmas cards to send...waaaaaaaay behind! So my challenge to myself was to try to make cards that are 'clean and simple,' or in cardmaker's lingo that would be CAS. One would think that that would not be a challenge at all, but I have a love affair with designer papers, ribbons, bling and glitz and lots of layers on my cards. Consequently, for me to stamp and color and be satisfied with the outcome is a challenge. I must say, though, I am pleased with this CAS card. I've stamped Merry Christmas on the inside, but it could easily be used as a winter notecard or, perhaps, a thank you card after the holidays.
In order to highlight my little Christmas Poinsettia basket I decided to emboss a design around the image. I used a Spellbinders die from the ironworks set to make the snowflake/doily embossing.

Card Recipe:

Stamps: Stampin' Up! Bitty Bouquets (1999 hostess set) and inside sentiment is Stampin' Up.
Ink: Momento Tuxedo Black. Image colored with Copic markers
Accessories: Spellbinders Ironworks embossing die, Tonic Holly corner punch, red and yellow stickles glitter.

I must admit that I enjoyed making this card. It was hard not to add "just one more element" and the mister was laughing at me as I kept asking him, "what if I just added one more thing."

I'm going to make some different CAS Christmas cards. They are certainly more easily mailable without extra postage requirements due to bulk, and they are fast to mass produce.

Until next time,
Cheers!

Jennifer

Thursday, November 24, 2011

Country Christmas Wreath

I'm always attracted to primitive country designs and I wanted to design a Christmas card that was simple and of a country feel, so I pulled out a favored Stampin' Up! stamp set called Nellie the Nest Lady and set about using the vine stamp and wreath stamp and this is what I came up with.


Card Recipe:
Stamps: Stampin' Up! "Nellie the Nest Lady"
Ink: Stampin' Up! Chocolate Chip, Tim Holtz distress inks in Vintage Photo, Tea Dye and Aged Mahogany
Cardstock: Stampin' Up! Kraft cardstock, Michael's Christmas pack cardstock in green and beige.
Assessories: Cuttlebug tag die, Nestabilities oval and scalloped oval dies, Stampin' Up! Early Espresso Baker's Twine, Liquid Pearls in Ruby Red, Corner Rounder punch, Ribbon and Button are from my sewing box and the PEACE sentiment is computer generated.

I hope all of my family and friends in the United States are enjoying a wonderful Thanksgiving day.

Cheers!
Jennifer

Tuesday, November 22, 2011

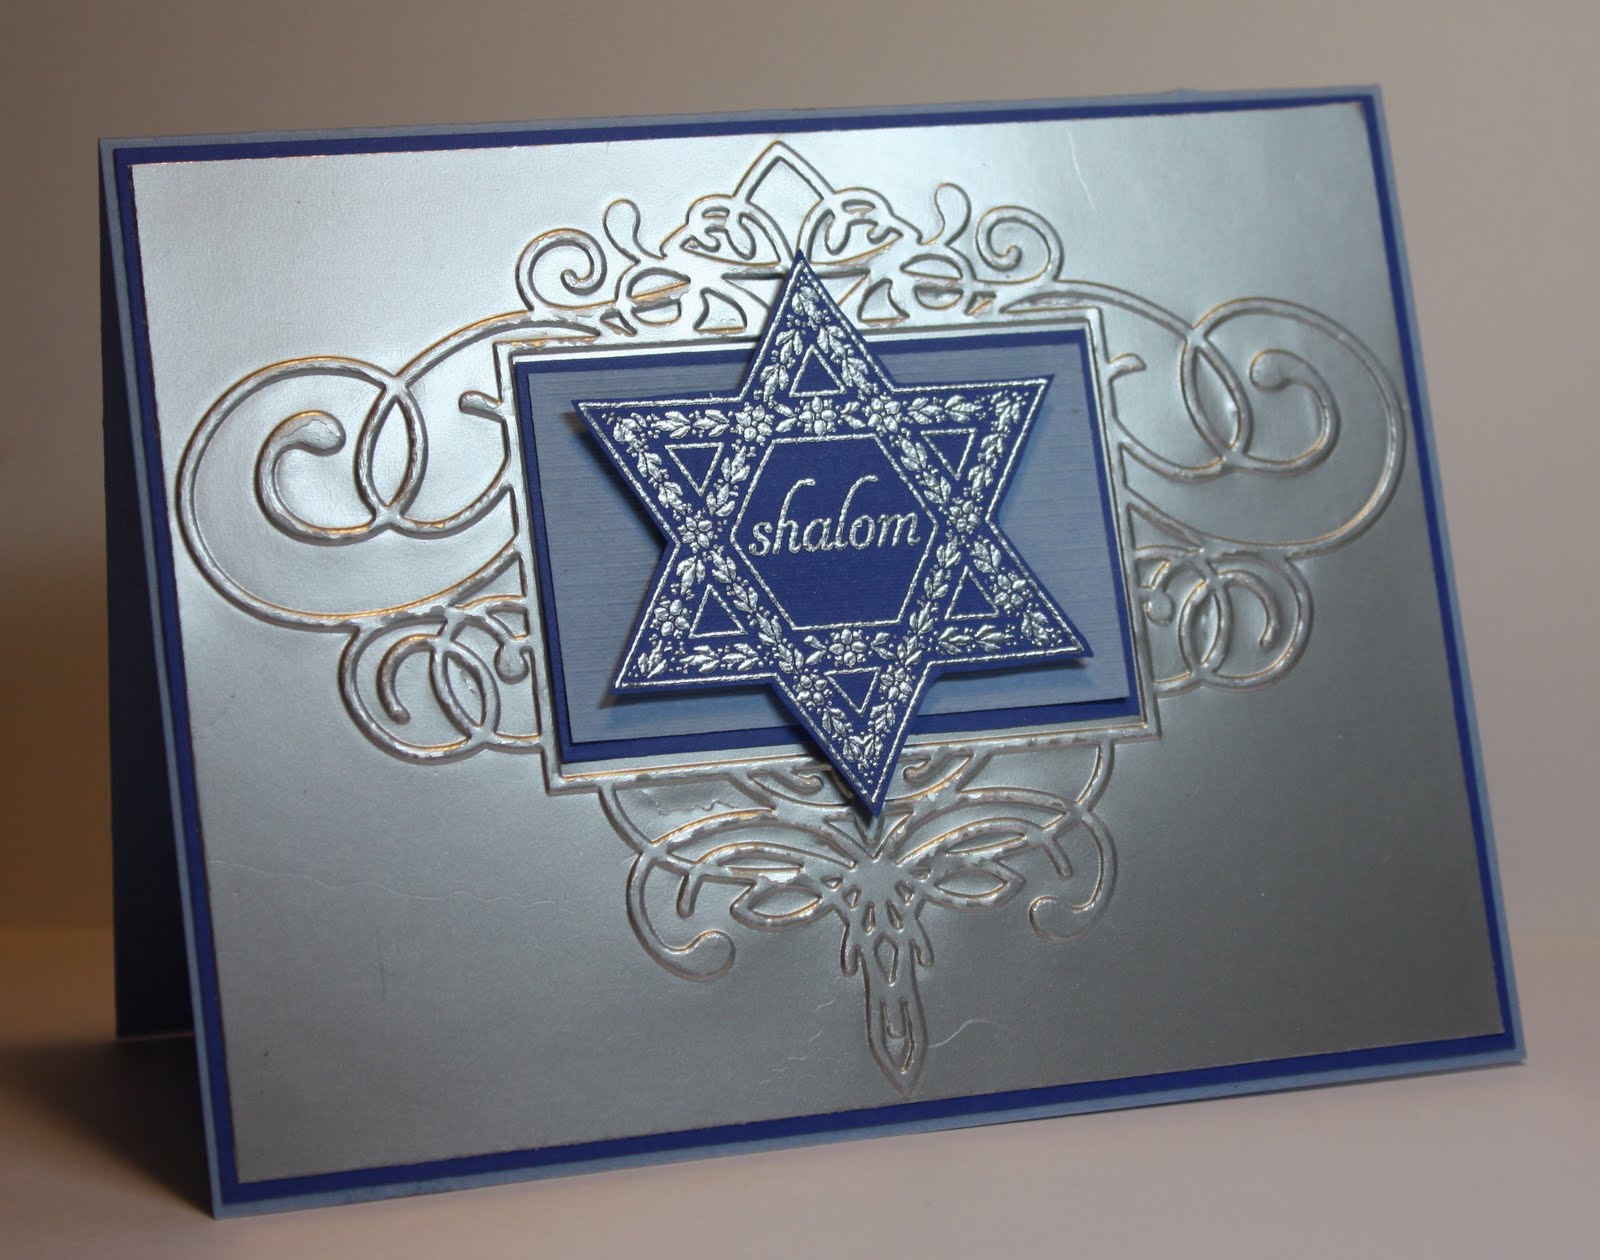
Shalom

It is a very cold, cold day here and the perfect day to stay indoors, sip hot tea and make cards! I was eager to ink up my brand new Shalom stamp for some Hanukkah cards.

This is a very simply made card but hopefully comes across as elegant.

Card Recipe:

Stamps: SHALOM from Stampin' Up!
Ink: Versamark
Cardstock: Dark and light blue from Recollections and the silver is from my local stamp store
Embellishments: Silver Detail embossing powder, cuttlebug embossing folder, foam tape.


We are predicted to get snowfall tonight. I believe it because it is so cold right now. I've got a loaf a Black Forest Pumpernickle bread in the bread maker baking and soup on the stove for dinner tonight.

Stay warm!
Cheers!

Jennifer

Friday, November 11, 2011

Peach and Blueberry Cobbler with Créme Anglaise

Temperatures are plummeting as we get a pre-winter blast of cold air and for me that means I'm serving the mister hearty meals followed by warm dessert. Last night's meat loaf, carrots and broccoli with buttered egg noodles was filling and good on a cold night but we both wanted something sweet and warm for dessert. Meals like this make me happy that I can pull from the larder a jar of peaches that I canned when they were ripe and juicy and freshly picked blueberries I froze last summer. MMmmmm...peaches and blueberries quickly made into a hot Peach - Blueberry cobbler.
A couple of years ago on our trip to England for my son and daughter-in-laws wedding I made a delightful discovery about British cuisine! My English family and friends serve this wonderful, thick and oh-so-delicious créme anglaise over cobblers, fruit crisps and even chocolate cake. The mister and I were sceptical at first but after one bite of dessert with this heavenly creme, we were hooked!
OK...admittedly I cheat a bit when I make créme anglaise. I'm not sure if Bird's créme anglaise custard powder is available world wide but here in Canada it is the fast and easy way to whip up this heavenly creme.
This is my favorite peach cobbler recipe. The "cobbler" part is light and cake-like and the fruit on the bottom is warmed in the oven prior to adding the cobbler, giving it time for the fruit juice to thicken and not cause the cobbler to be mushy.

PEACH - BLUEBERRY COBBLER

INGREDIENTS:
1 qt jar of canned peaches (if you use fresh peaches you'll need about 8 peaches, peeled, pitted and chopped)
1 cup blueberries
1/4 cup white sugar
1/4 cup brown sugar
1/4 teaspoon ground cinnamon
1/8 teaspoon ground nutmeg
1 teaspoon fresh lemon juice
2 teaspoons cornstarch

1 cup all-purpose flour
1/4 cup white sugar
1/4 cup brown sugar
1 teaspoon baking powder
1/2 teaspoon salt
6 tablespoons unsalted butter, chilled and cut into small pieces
1/4 cup boiling water

3 tablespoons white sugar
1 teaspoon ground cinnamon
1/8 cup ground pecans or walnuts (optional - the mister prefers I don't add them but I like them!)

DIRECTIONS:

1.) Preheat oven to 425 degrees F (220 C)

2.) In a large bowl, combine the first 7 ingredients to make the fruit mixture for the bottom. Toss to coat evenly and pour into a 2 quart baking dish. Bake in preheated oven for 10 minutes.

3.) While your fruit is baking, in a large bowl combine flour, 1/4 cup white sugar, 1/4 cup brown sugar, baking powder, salt. Blend in butter with your fingertips or a pastry blender until the mixture resembles a coarse meal. Stir in the water just until combined.

4.) Remove fruit mixture from the oven and drop spoonfuls of topping over the top. Sprinkle the top of the entire cobbler with the sugar/cinnamon (nut) mixture. Bake until the topping is golden brown (about 25 minutes).

ENJOY!!

Jennifer