Sunday, March 31, 2013

Happy Easter


From all the critters, the Mister and myself, we wish you Peace, Love and Blessing this Easter.

Happy Easter!

Jennifer


Thursday, March 28, 2013

A card of appreciation

Last October the Mister and I had our pictures taken and I posted about the day in my post Me, The Mister and The Girls.  It was a rare occasion for us (especially me) to stand in front of a camera but we were really happy with the photos.  You can see some of the photos taken here.
 
When I approached Stephanie Burns, our friend and photographer of In Frame Photography, with the idea of taking our pictures with the horses I was thrilled when she suggested that in lieu of monetary payment that we barter.  Among the many hats that Stephanie wears, from Police Officer, Photographer, owner/operator of the boarding facility where our horses live, Stephanie also competes in Equestrian events and asked if I would make some "show apparel" for her for this summer's competitions.   Don't you love exchange of services?  I was very happy to sew for her after receiving the lovely photos she took of us. 


In addition to the show clothing, I wanted to tuck in a small extra token of appreciate so I made her this set of cards to use to include when she presents her customers with their photographs that would also include her business name, i.e. In Frame Photography. 
 
I decided to try to replicate her website layout/design as closely as possible and this is what I came up with.

Card Recipe
Stamps:  Stampin' Up Bareback, Impression Obsession floral flourish, and Just Rite alphabet stamper for the title.
Ink:  Ranger Jet Black Archival Ink
Cardstock:  White Linen, silver metalic and black
Accessories: Double Sided sticky paper over the stamped image and cover with crystal Glitter Ritz Micro fine glitter, Nestibilities Labels die and rectangle die, Stampin' Up! oval punches, pink and diamond crystals, miscellaneous sheer ribbon.


Again, to Stephanie I must say a big Thank You for the lasting memories of a fun day of photography with the horses.
 
Until next time,
Cheers,
 
Jennifer

'The girls' in winter

Even though the calendar on the wall states that it is spring, when I look out the window here in Eastern Ontario I see the remains and reminders of winter. I'm not a huge fan of a lot of snow.  My girls, however, don't mind it at all.

Of my three Newfoundland dogs, Miss Paige loves snow the most.  She loves to catch snowflakes on her tongue and lay out in the biggest snow drift she can find.  Last week we had another substantial snowfall and while Paige's brothers (Gabe and Noah) prefered to watch from the window, Paige was eager to be outside and enjoy what I hope will be our last big snowfall.
 

Yesterday Dr. Carole came out to the barn for the spring herd health checkup.  My Canadian mare, Gypsy, spotted me getting out of my vehicle as soon as I pulled in the laneway and plodded through the snow to greet me as I arrived.


Like Paige, Miss Gypsy is an outdoors-y, winter lovin' gal.  One of her favorite activities is rolling in the snow.  Weeeeeeeeeee!

Gypsy came to me as soon as she saw me.  I'm not sure if it is because she loves me or because she's fairly certain I'll have a treat in my pocket.  Nevertheless, she comes to me. 
 
 
And I can't leave out my sweet, SWEET Newfoundland Pony, Flower.  Flower is a fuzzy gal this winter though she's begun her spring shedding and soon she'll be sleek and smooth.  Flower is another outdoors-y kind of girl.  She's outside 24/7 preferring to be out in the elements rather than in the barn.


Flower and one of her buddies (Jet) were watching and waiting for their turn to be seen by Dr. Carole.
 

Sweet Miss Flower...a muddy mess.  I asked her, "Have you been rolling in the mud, Miss Flower?"  Her response was, "Why yes I have!  Why do you ask?"


I'm eager for the snow to melt and more springlike temperatures to be here.  In the meantime, all three of my girl critters are showing the first signs of spring of the animal world and that is SHEDDING and MUDDY. 
 
Let the spring cleaning begin!
 
Until next time,
Cheers!
 
Jennifer

Sunday, March 24, 2013

Cake Dome Sunday #15: Butterscotch Pie - the failure

When I was a little girl every summer my siblings and I and our mother would spend about two weeks with my Grandma and Grandpa Inman while our father was doing his yearly training for the Army Officer Reserves.  In the town where Grandma and Grandpa lived was a pie shop that Mom and Grandma just thought was 'the bee's knees!'  Grandma and Mom shared a love of pies and both could bake a pie that were argueably THE BEST pies you've ever tasted.  My mother still, at 86 years young, can make a Lemon Meringue Pie that will make you pucker and smile at the same time.

But what I remember about my Grandma Inman's pies was her love of butterscotch and what a wonderful butterscotch pie she made.  I shared that same desire and whether it topped ice cream, was mixed into a milk shake or was made into a pie made no difference to me.  Oh how I love butterscotch.

Now you might notice that I'm into my third paragraph of this litany and I still haven't posted a picture.  That's because...I completely failed at my attempt to make a Butterscotch Pie for this week's "Cake Dome Sunday" post.   Oh I made a pie!  Yes indeedily-do I did!  But it tasted awful!  Horrendous!  So yucky that the Mister actually said, "Darlin', this is BAD!"

Notice here tears flowing and feeling like a complete and utter failure!

You see, I don't have Grandma Inman's recipe for Butterscotch Pie.  I found a recipe in a lovely cookbook that I was just sure would be perfect.  In fact, I'm sure it probably is a good recipe but somewhere along the line I messed it up.   I can't say what step or what I did wrong.  It just was awful when we took a bite.

I figure sometimes you just have to admit your mistakes and try again.  I won't give up on my Cake Dome Sunday posts.  I couldn't if I wanted to because the Mister has gotten very spoiled with his Sunday desserts. 

In the meantime, if anyone has a good recipe for Butterscotch Pie, would you mind emailing me your recipe.  I really want to give it a go again.

Until next time,
Cheers!

Jennifer

Thursday, March 21, 2013

Thinking of you at Easter


Easter has snuck up on me this year so I decided I'd better get busy and spend the day making a few cards for sending.  I had fun this morning pulling out some of my older and well loved and used stamps.  This PSX bunny is such a sweet image for an otherwise simple card.

  On the inside I stamped a simple "Thinking of you at Easter" sentiment using a very old Darcie's sentiment stamp leaving plenty of room for a brief message.


Card Recipe:
Stamps:  PSX G-1047 and Darcies F2619
Ink: Memento Rich Cocoa and Tim Holtz Peeled Paint Distress in by Ranger  Image colored with Copic Markers
Accessories:  Machine stitching, miscellaneous button from the button box, Orange Jute, Die-namics Label die from My Favorite Things.

More Easter cards are in the works so I had better get them finished up.  Hope you are enjoying a lovely day!
 
Until next time,
Cheers!
 
Jennifer

Sunday, March 10, 2013

Cake Dome Sunday #14: Nanaimo Bars


This Sunday's special treat for the Mister is one that I had intended to make during my Christmas baking:  NANAIMO BARS!
 
This truly Canadian treat gets its name from its place of origin: Nanaimo, British Columbia.  The Mister tells me that everyone out west (where he is from) claims to have THE BEST Nanaimo Bar recipe.   The truth is, no matter what ingredients you use to make these rich bar cookies, they are bound to be delicious.
 
 
Since I am a simple Indiana Hoosier girl living in Canada I am going to rely other's advice for a good recipe.  I do know that every varying Nanaimo bar I've ever eaten has been yummmmmy so I thought I'd use this recipe for Cinnamon Milk Chocolate Nanaimo Bars because I like the combination of cinnamon and chocolate.
 

CINNAMON MILK CHOCOLATE NANAIMO BARS

Ingredients

Base:
  • 2 cups chocolate cookie crumbs
  • 1 cup sweetened flaked coconut
  • 1/3 cup icing sugar, sifted
  • 2 tbsp cocoa powder, sifted
  • 1/2 tsp cinnamon
  • 1/4 tsp salt
  • 1/2 cup unsalted butter, melted
  • 1 large egg
Filling:
  • 6 tbsp unsalted butter, at room temperature
  • 1 3/4 cups icing sugar
  • 2 tbsp milk
  • 2 tsp vanilla
  • pink food coloring (optional)
Topping:
  • 6 ounces milk chocolate, chopped
  • 2 tbsp unsalted butter
  • 1 tbsp corn syrup
  • edible décor such as sprinkles, quins or colored sugar
  1. For the base, preheat the oven to 350 degrees F.  Grease an 8-inch square pan and line it with parchment paper so that the paper comes up the sides.
  2. Stir together the chocolate cookie crumbs, coconut, icing sugar, cocoa powder, cinnamon and salt, and then stir in the melted butter and egg until evenly combined.  Press this into the bottom of the prepared pan and bake for 15 minutes.  Cool completely before preparing the filling.
  3. For the filling, beat the butter with 1 cup of the icing sugar until blended, then add the milk and vanilla, blending again.  Add the remaining icing sugar and beat well until smooth and fluffy.  Stir in the pink food coloring, if desired.  Spread the filling over top of the cooled cookie base.
  4. For the topping, melt the chocolate, butter and corn syrup together in a metal bowl and place over a pot of barely simmering water, stirring until smooth.  While still warm, pour this over the filling and spread (or tilt the pant) until the filling is completely covered.  If desired, sprinkle on any edible décor.  Chill the pan until set, about two hours.  Slice into squares with a hot, dry knife.
The squares will keep, refrigerated, for up to a week.

Makes one 8-inch square pan
Cuts into 16 to 36 bars

Recipe courtesy of Anna Olson.


Mmmmmm....I think I might just make a cup of tea and have one of these right now!
 
Until next time,
Cheers!
 
Jennifer

Friday, March 8, 2013

Canvas mixed media ATCs


Canvas, mixed media and ATCs...three mediums that are not generally in my comfort zone. So why not dive in, take the plunge, get wet and immerse myself in these unfamiliar art forms?  (WOW...that was an overload of metaphors and hyperbole!) HA!

This ATC (artist trading card) is for the second swap I joined recently. The challenge was to create an ATC using canvas as the surface element. And mixed media seems to really be the rage for a while now so I have cautiously tried my hand at it.


For my ATCs I began by watercoloring the canvas in a wash of  3 different colors of Twinkling H2O's watercolors.  I haven't removed the lids from these little watercolor paint pots in ages and I thoroughly enjoyed seeing the the watercolor with the lovely shimmery-sparkle once dried on the canvas.  


Once the watercolor background was thoroughly dried I used Dreamweaver Pearlescent Embossing Paste over a Martha Stewart butterfly stencil.  After carefully removing the stencil, while the embossing paste is still wet, the ultra fine glitter was applied to the butterfly body and wings.  I stamped the words "Embrace Happiness" with RANGER jet black Archival Ink using Papertrey Ink sentiment stamp.  Then I used a Martha Stewart rose leaf punch for leaves and Prima ASTER flowers with half pearl centers to finish the ATCs off.


These were a lot of fun to make.  I know that mixed media artwork can involve so much more technique, but for my first time working on canvas, I started simply, leaving a lot of room for future creativity. 
 
Until next time,
Cheers!
 
Jennifer

Monday, March 4, 2013

Cake Dome Sunday #13: Chocolate Griddle Cakes with Cinnamon Peaches and Crème Anglaise

What's under the Cake Dome Sunday #13 was not actually a dessert that I could serve from the cake saver but it most definitely is a dessert that got huge raves from the Mister.  Last weekend I had the opportunity to attend a cooking class at Le Cordon Bleu with Food Network Chef, Anna Olson.  You can read more about my experience last week HERE.   As I mentioned, Anna Olson is my very favorite Food Network chef so actually meeting her and taking a short course with her was the height of culinary excitement for me!
 
The Mister bought me Anna Olson's cookbook, FRESH.  It is a fabulous cookbook filled with mouth watering recipes for every season and I wanted to make him something out of it for this week's dessert treat, so I chose Chef Olson's recipe for CHOCOLATE GRIDDLE CAKES with CINNAMON PEACHES and Crème Anglaise.


This simple dessert (and truly, it IS simple to make) is such a fun surprise.  Chocolate griddle cakes with chocolate chips in them, covered in peaches that you've simmered slightly in maple syrup and butter and cinnamon.  Now the Crème Anglaise was my addition to the recipe.  You certainly don't need it, but ever since the Mister and I traveled to England and savored the wonderful fruit desserts that were topped with Crème Anglaise we like to add it as an extra little pizzazz.  A dollop of whipped cream or even a small scoop of Vanilla Bean ice cream would be good too.  And truly...you don't NEED anything at all on top of the peaches if you don't want to. 


First you make the chocolate griddle cakes and keep them warm in the oven while you mix up the peaches.  The entire dessert is served warm and ohhhhhhhhh yummmmm...it is so good!  Warm chocolate and warm peaches.........nummmmm.
 
I discovered this video of Anna Olson making the Chocolate Griddle Cakes and thought you might enjoy seeing it. 


So there we have week #13 of my "What's Under the Cake Dome Sunday."  I never expected when I found the old domed cake saver in the second hand shop that it would turn into such a fun weekly surprise.  And believe you me!  The Mister has come to expect a treat each Sunday.


Until next time,
Cheers!
 
Jennifer

Sunday, March 3, 2013

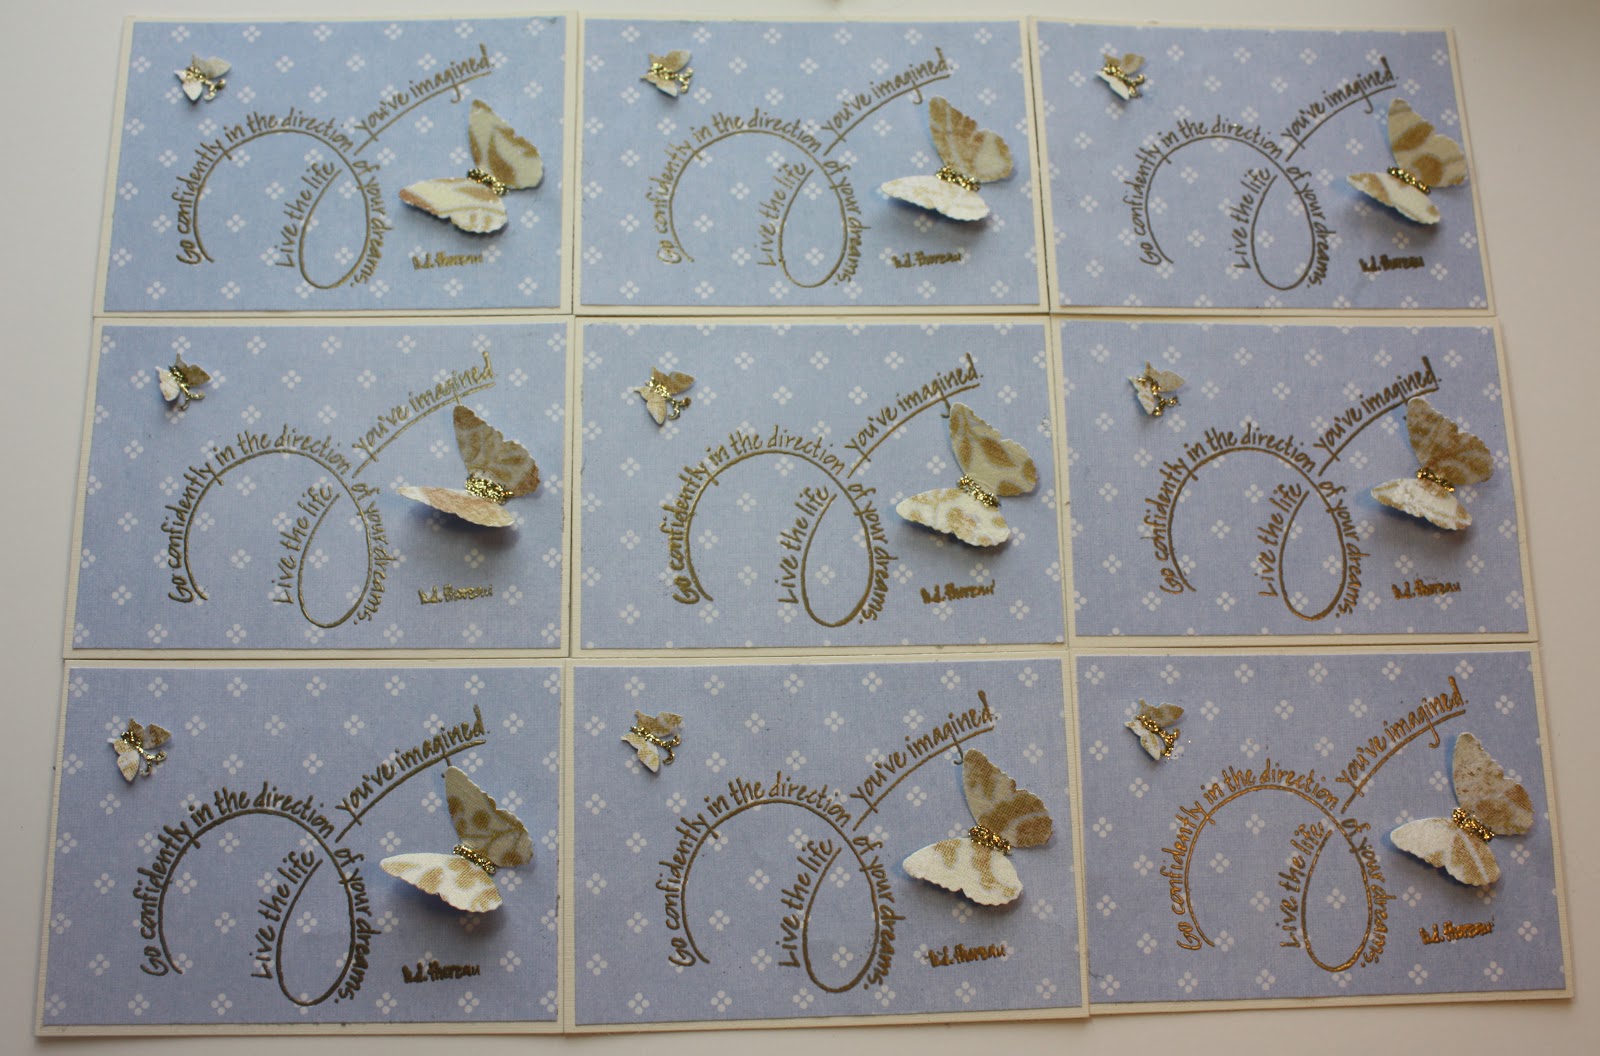
"Go confidently in the direction of your dreams..."

"Go confidently in the direction of your dreams. Live the life you've imagined." This beautiful and inspiring quote is the words and thoughts of Henry David Thoreau. I find it to be a very impowering sentiment.


It has been a long time since I've made ATC's (Artist Trading Cards.)  These little 2 1/2  by 3 1/2 inch canvas have always presented a challenge for me to create on such a small space.  But when one of my stamping friends invited me to participate in her "Sentiments ATC swap" I knew immediately the stamp I wanted to use.   


Each player in the swap creates 9 baseball card size creation and we send 8 of our creations to the hostess of the swap.  When she recieves everyone's ATCs she swaps them amongst the players and returns 8 original ATC works of art from the other players.  You keep one of your own (the 9th ATC you made) so that you end up with one of your own and 8 others. 


I'll pop these in the mail tomorrow to our swap hostess and in a month or so I'll received Sentiment ATCs from the other players. I'm looking forward to receiving these little inspiring ATCs from the other "players" in the swap.

Until next time,
Cheers!

Jennifer

Tuesday, February 26, 2013

My afternoon at Le Cordon Bleu


This past weekend I had the opportunity to take a short course/demonstration class at Le Cordon Bleu in Ottawa.  Anna Olson, my favorite Food Network Chef, was there to teach a class on Warm Winter Desserts.  I just could not pass up this unique opportunity to attend a class at Le Cordon Bleu and especially with a chef I admire so much!

I arrived at Le Cordon Bleu a little early and drank in the beauty of not only the building, but the interior restaurant, classrooms/kitchens and just the excitement and awe of being inside this world renowned culinary institution. 

 
Chef Anna Olson is as personable and down to earth as she is on television.  Since I watch her show regularly I felt like I was spending an afternoon with my longtime friend.  Anna and the chef of the Ottawa Le Cordon Bleu school as well as four student chefs were in the classroom/kitchen setting up and greeting us, their afternoon students, as we arrived.  Anna warned us there would be a test at the end of her class..........a taste test! 

 
Anna prepared three different desserts in the short timeframe of the course, all the while answering questions on a variety of culinary topics.  I took notes as fast as my pudgy fingers could write. 
 
While she prepared the desserts, chemestry and technique were key points of her presentation.  In a culinary classroom you are not presented with a "...add 2 cups of flour and 1 cup of sugar" type of education.  We explored the whys and hows and wherefores of the chemical reactions with not only the ingredients, but also the types of utensils (such as baking pans or sheets) you use.  In addition, how flavors develop or, how to develop flavors more prominently depending upon the foods you are preparing were discussed.
 

Being able to watch above in the overhead mirrors as well as straight on allowed the class to actually see the incorporation of ingredients as the correct blending and texture took place.

 
We discussed and learned so much!  I just can't begin to describe how fascinating the course was!  My head was practically spinning by the end with all I was taking in.  Do you know:
  • the differences in flours, (even in "all purpose"), the makeup of the types of flours, winter or summer wheat
  • what DOES the egg yolk do, the egg white, the combination of both and when to use one or the other, or both.  The makeup and weight of the egg and how to substitute for those who cannot eat egg without changing the flavor and texture of your food?
  • differences in (for example) pie plates.  When do you use (with best results) a glass plate, metal plate or a beautiful ceramic pie dish and why it does make a difference.
  • baking powder, baking soda, when to use one, the other or both as well as types of levening agents and how they work
  • starches in cooking and baking, especially for those on gluten free diets
  • saving what might have been a baking disaster
  • creating barriers in pastries so the fillings will not soak through and cause soggy crusts
  • all vanilla is not the same and the about varieties
  • creating a divine Choux paste (Anna is piping a choux paste for crullers in the above photo)

When the class was over, the chefs presented us with a champaign and hors d'œuvre meet and greet and photo opportunity.  In addition to the champaign and hors d'œuvre, we also enjoyed each of the three desserts that Anna had created in front our eyes.  Oh my...we were on a chocolate high by the end of the afternoon.  And the hors d'œuvre that the students of Le Cordon Bleu had created were beautifully presented and tasted devine.  Such a variety of unique creations.  Have you been watching the new cooking show "The Taste"?  Well, that is how these were presented to us. 


In addition to all of the actual culinary discussions, Anna also kept us in stitches and fascinated about the behind the scenes information with regard to what goes into a television cooking show, how it is filmed, hysterical anecdotes that you don't always see on your tv set.

 
I wasn't sure if we could take photos when I left for the class so I didn't take my "good" camera with me.  I did remember to tuck my little pocket Elph camera in my purse "just in case."  As it turned out, taking photographs was welcomed, so we all snapped away.  Sadly, my photos didn't turn out as well as I wish they had.  I'm sharing the best of what I could salvage.  The photo (above) is one of three incredibly amazing and gravity defying sugar creations that students at Le Cordon Bleu had created.  I am sorry you cannot see the detail of this sculpture.  It is amazing. 
 

And what's a delightful afternoon out and about without a little shopping, eh?  Yes, there was a Le Cordon Bleu Boutique.  You KNOW I couldn't leave the institute without picking out a few souvenirs from my day.  One item I purchased that isn't pictured is a silicon baking mat.  I'm eager to try it out.  Perhaps I'll make The Mister some cookies this afternoon.  


All too soon it was time to leave a most memorable afternoon and experience.  I took away so much information from this course and had so much fun too.  As you can see from the photo, Le Cordon Bleu has a restaurant inside the school too.  One day I hope the Mister and I can get reservations to eat there. 
 
Le Cordon Bleu has a fascinating history and is now located in countries all over the globe.  In addition to the main full time courses of study, they do offer short courses spanning anywhere from one to three to seven full day courses as well as the 2 hour demonstration courses.  If you live in an area where a Le Cordon Bleu school is located (the Ottawa Le Cordon Bleu is the only one located in all of Canada) I would encourage you to check out what is available.  I was chatting with a woman who told me that in a couple weeks she will be taking her 8 year old son to a special children's course that is being offered during spring break.  What an awesome opportunity for young children!
 
I will most definitely be making The Mister one of the desserts that Anna Olson prepared for us.  Perhaps you'll see it here on my blog next weekend for what's under the cake dome Sunday.
 
Until next time,
Cheers!
 
Jennifer

Monday, February 25, 2013

Loss of furry friends


This weekend I made two more sympathy cards for the loss of a beloved furry companion.  As a card maker I thoroughly enjoy being asked to make a card for occasions of any kind.  And I am touched that people ask me to make something to send for them.  Sympathy cards, however, are the hardest of all occasion cards to make.


 Both dogs lived long lives, but in the end were taken by cancer.  I decided to make the cards essentially the same layout.  The differences are the designer papers and the sentiment on the front that I used.  The inside sentiments are the same.


Card Recipe:
Stamps:  Paw print on the outside by Inkadinkadoo.  Sentiments by Papertrey Ink"With Sympathy: Loss of pet"
Designer Papers:  K & Company
Ink:  Versamark and black detail embossing powder and Momento Tuxedo Black
Accessories and Embellishments: Nestibilities flower die and Nestibilities rectangle and scalloped rectangle dies, craft felt, Martha Stewart rose leaf punch, prestamped pawprint cotton twill tape.

 
Until next time,
Cheers!

Jennifer


Wednesday, February 13, 2013

Beaded Bracelets and Earrings

Yesterday I posted several beaded Shepherd Hook Bookmarks that I've made and put in my shop.  I've been bitten by the "beading bug" and proceeded to make some bracelets with matching earrings.

These are really fun to wear for a more casual look. 

The beads in the earrings match the bracelets.
If have seen my Shepherd Hook bookmarks, you probably recognize some of the same mineral beads and silver etched spacer beads as in the bracelets and earrings.

I tend to make what appeals to my more casual life and to what I enjoy.


I made this green/orange multi-mineral bead and silver etched beads bracelet in a similar style for myself and wear it practically everyday in combination with my ever present silver bangle bracelet.  They just seem to go together so well.
 

I love these feather charms.  I just do.
If you'd like any of the above bracelets and/or earrings they are all available at my ETSY SHOP.
Thanks for looking!
Until next time,
Cheers!
Jennifer


Shared on:

Tuesday, February 12, 2013

Beaded Shepherd's Hook Bookmarks


This comic has been making the rounds on Facebook and Pinterest and it gave me a big chuckle.  Yes, I love the ability to carry my library in my hand with my Ipad, but I also love books.  You remember books...made of paper and binding and the tactile connection between the author's written word and your imagination.
 
How do you mark your place in your books?  A scrap of paper, a dog earred corner?  A piece of tissue?
 
I've been having the best time making these bedazzled Silverplated, Shepherd's Hook Bookmarks.  They are like jewelry to mark the place in your made-of-paper books.

 
These markers will not damage your book.

 
They are eye candy for the Bibliophile.


Perhaps you have a bibliophile in your life who might enjoy a Beaded Shepherd's Hook Bookmark.  These three are handmade by ME are now available in my shop!
 
Until next time,
Cheers!
 
Jennifer


Shared on: