Monday, January 27, 2014

Mini Log Cabin Squares on Tea Towels and Pot Holders


The other day I posted about making my first Log Cabin Quilt Block.   I joined in on the It's a New Year SEWALONG group on the website, blog and facebook page.  January's SEWALONG challenge is to make Mini Log Cabin blocks and then create something with your blocks.  If you're interested, you can read  HERE  how week by week during the month of January the SEWALONG group fulfilled assignments all the while working toward the goal of creating something with your miniature Log Cabin Quilt Block. 
 

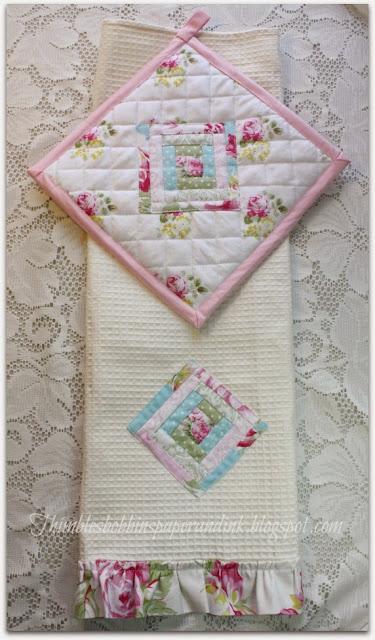
Today is my reveal of what I decided to do with my mini log cabin quilt blocks.  I made two tea towels with coordinating hot pads.  Each item incorporates my mini log cabins as the focal point.


I chose to use these lovely floral fat quarters that I had in my stash by Tanya Whelan called Sunshine Roses, for Free Spirit Westminster Fibers.

 
With these fat quarters I made them into this log cabin block.


For the tea towels, I appliqued the quilt block on huck toweling fabric and added a flounce/ruffle at the bottom of each towel with a coordinating Tanya Whelan fat quarter.
 
The pot holders are also of a coordinating Tanya Whelan fat quarter for the outside designer fabric.  Beneath the designer fabric is a layer of Insul-Bright lining.  It is a heat resistant lining/batting material that is perfect for hot pads.  Next came a layer of batting.  On the opposite side of the pot holder I layered the same layers and with wrong sides together I basted the two sides together.  Next I quilted the diamond shape quilting.  Then I quilted the mini log cabin square to the center of one side of the potholder.  Finally, I bound the edges with double fold bias tape.
 

This was such a fun project to make.  The other members of the Sewalong have been posting some of the most creating and beautiful projects.  Each made with mini log cabin squares as the focal point.  I'm so glad I stepped out of my comfort zone and joined in the fun with the Sewalong group.


Until next time,
 
Cheers!
 
 
Jennifer 


Follow my blog with Bloglovin

I was featured:


also at:


and:

Crafty Allie


Some of my favorite online blog hop parties I like to share at:
 
 Worthwhile Wednesdays, Wake Up Wednesdays, Clever Chicks Blog Hop, FoodySchmoody Tuesday Tastings,  Delish Dessert Link Party, Share your stuff Tuesdays, Anyonita Nibbles Tasty Tuesday'sShare it One More Time, Much Ado About MondayFeathered Nest Fridays, DIY Vintage Chic FridayThe Style Sisters Centerpiece Wednesday, Sew-Off Saturday Sew Can She , Brag about it Tuesday BeBetsy , Shabby Art Boutique Shabbilicious Friday , Give Me The Goods Monday , Homestead Barn Hop , Whimsy Wednesday , Knick Of Time , Hickory Trail , Make the Scene Monday (at Alderberry Hill), From the Farm Blog Hop , A Peek Into My Paradise , A Delightsome Life , Share your Cup Thursday Have a Daily Cup, Homework , Green Willow Pond , A Stroll Thru Life , Work It Wednesday , Savvy Southern Style , I Should Be Mopping the Floors , Common Ground Be Inspired , Simple and Sweet Fridays , Frugal Fit Family Friday Follow Along , Sweet and Savory Sunday This Gal Cooks Marvelous Mondays , This Silly Girl's Life, Living Better Together TGIF Linkparty , DIY Sunday Showcase , Dear Creatives Inspiration, Super Saturday Link Party


Sunday, January 26, 2014

Chewy Butterscotch Chip Oatmeal Cookies

 
Today's "what's under the cake dome Sunday #45" is not what I had planned.  The Mister has a man-cold is sick and not feeling up to the pie that I had planned to make today.   But it is a good day for cookies and milk.  It's cold and snowy just like it is in a great deal of North America and I just didn't feel like going out to the grocery store.  So...I went through the cabinets and found: Butterscotch chips (we were out of chocolate chips) coconut, oatmeal, an orange and decided I'd create a chewy Oatmeal cookie that included coconut (great for the tender 'chew' in the cookie) and cut just a bit of the sweetness of the butterscotch chips and sugar by adding a bit of orange zest and juice and cinnamon.


What I created was a yummy clean-your-cabinets-out kind of cookie and I want to share my baking-by-the-seat-of-your-pants recipe with you.  This is how I made them:
 
 
Chewy Butterscotch Chip Oatmeal Cookies
 
Ingredients:
  • 1 cup shortening
  • 3/4 cup white granulated sugar
  • 3/4 cup brown sugar
  • 1 teaspoon vanilla
  • 1 teaspoon orange juice
  • 1 teaspoon orange zest
  • 2 teaspoons vanilla
  • 2 eggs
  • 1 1/4 cups flour
  • 1 teaspoon baking soda
  • 1/2 teaspoon salt
  • 1 teaspoon cinnamon
  • 2 cups oatmeal
  • 1 cup coconut
  • 12 ounces butterscotch chips
 
Directions:  
 
(Preheat oven to 375 degrees)
  1. Beat together the shortening, white and brown sugars until creamy. 
  2. Next, beat in the vanilla, orange juice and orange zest and the eggs.  Beat well.
  3. Sift together the flour, baking soda, salt and cinnamon.  Gently mix the dry ingredients into the wet ingredients just until blended together.
  4. Finally, mix in the oatmeal, coconut and butterscotch chips.  Incorporate well.
  5. Line a large cookie sheet with parchment paper.  Drop 1 inch balls of cookie dough onto parchment lined cookie sheet and bake in preheated 375 degree oven for 12 - 15 minutes.  Watch carefully!  Oven temperatures vary.
  6. Remove the cookies from the oven just when the bottoms begin to get golden brown.  DO NOT OVER BAKE!  Even if the tops don't look completely set, remove them from the oven when the bottoms are brown.
  7. Let the cookies rest on the cookie sheet for 5 minutes before transferring them to a cooling rack.
Yield: Approximately 3 dozen cookies.  This depends upon the size of cookie you make.
 
 
Now it is time to pour yourself (or your ailing partner) a big cold glass of milk and enjoy the cookies.  They're sure to sure what ails you...or at the very least, make you feel a little bit better.


Next week I'll make the pie.  It is going to be an extra special one you won't want to miss.
 

Until next time,
 
Cheers!


Follow my blog with Bloglovin


Some of my favorite online blog hop parties I like to share at:
 
 Wake Up Wednesdays, Clever Chicks Blog Hop, FoodySchmoody Tuesday Tastings,  Delish Dessert Link Party, Share your stuff Tuesdays, Anyonita Nibbles Tasty Tuesday'sShare it One More Time, Much Ado About MondayFeathered Nest Fridays, DIY Vintage Chic FridayThe Style Sisters Centerpiece Wednesday, Sew-Off Saturday Sew Can She , Brag about it Tuesday BeBetsy , Shabby Art Boutique Shabbilicious Friday , Give Me The Goods Monday , Homestead Barn Hop , Whimsy Wednesday , Knick Of Time , Hickory Trail , Make the Scene Monday (at Alderberry Hill), From the Farm Blog Hop , A Peek Into My Paradise , A Delightsome Life , Share your Cup Thursday Have a Daily Cup, Homework , Green Willow Pond , A Stroll Thru Life , Work It Wednesday , Savvy Southern Style , I Should Be Mopping the Floors , Common Ground Be Inspired , Simple and Sweet Fridays , Frugal Fit Family Friday Follow Along , Sweet and Savory Sunday This Gal Cooks Marvelous Mondays , This Silly Girl's Life, Living Better Together TGIF Linkparty , DIY Sunday Showcase , Dear Creatives Inspiration, Super Saturday Link Party


Thursday, January 23, 2014

Log Cabin Quilt Block


Ta daaaaaaaaaaa!  I made my first Log Cabin Quilt Block.   I joined in on the It's a New Year SEWALONG group on the website, blog and facebook page.  January's SEWALONG challenge is to make Mini Log Cabin blocks and then create something with your blocks.
 
 photo coversquare_zps5d0586a6.jpg
 
Week #1 Assignment was to choose the fabric you wanted to use.  I chose some lovely floral fat quarters that I had in my stash by Tanya Whelan called Sunshine Roses, for Free Spirt Westminster Fibers.

 
Week #2 Assignment was to cut your fabric pieces for the mini log cabin block.


Week #3 Assignment: Piecing and Pressing

 
My first block is a bit wonky but since this is my first time making a log cabin quilt blocks I'm fairly pleased.  The great thing about working week by week with the group on this little project is there is plenty of time to learn from mistakes and have the support and advice from a great online group of quilters.  

 
I know now how to better true up my edges as I sew and the rest of my blocks will be trued up better (I hope!)
 
Week #4 Assignment:  Make Something!   Now is the fun part.  I have more blocks to make so stay tuned.  I have a finished project in mind for my mini log cabin blocks.  The ladies have been posting the most amazing projects using their mini log cabin blocks.   Since I'm very new to quilting and to this group I'm just excited to play along. 
 
Within the next few days I'll reveal what I've done with my very first Log Cabin Quilt Blocks that I've ever made. 

Until next time,
 
Cheers!


Sunday, January 19, 2014

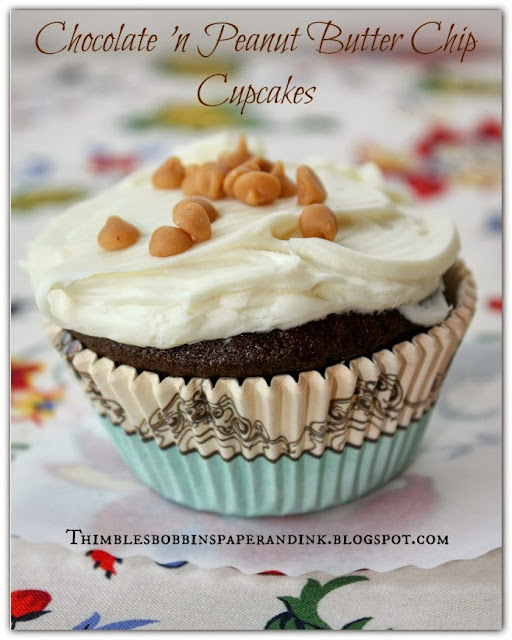
Cake Dome Sunday #44: CRAZY Chocolate 'n Peanut Butter Chip Cupcakes


What is so crazy about chocolate cupcakes with peanut butter chips?  They are CRAZY delicious and CRAZY easy to make.  And they are so CRAZY easy to make that if you have young children who like to help you bake, these are made-from-scratch chocolate cupcakes that even toddlers can help with.
 
When I was about 10 years old I started to really enjoy making a mess in  helping my mom in the kitchen.   I used to make a basic chocolate cake so often that when my mom made a family favorites recipe cookbook for me she included this recipe and titled it Jennifer's Crazy Cake.  This is a basic chocolate cake recipe that you dump all of the ingredients in the pan, make three holes in the dry ingredients for the three wet ingredients and then pour water on top.  Next, mix with a fork to get the lumps out and put the pan in the oven and bake.  CRAZY, eh?  It defies all of the pastry chefs and bakers advice on proper ways to make a delicious cake.
 
 
So today I used the basic CRAZY CAKE recipe and made cupcakes and added peanut butter chips to the batter, iced them with smooth and creamy whipped vanilla icing and sprinkled more peanut butter chips on top.  CRAZY simple and CRAZY moist and CRAZY delicious!
 
Below is the recipe for the basic 13" X 9" crazy cake.  But if you'd rather make cupcakes like I did today, just dump all the ingredients in a mixing bowl all at once, mix it all together and bake in cupcake tins. 
 
 
"MY" CRAZY CAKE
 
Grease and flour a 13" X 9" pan and sift the following ingredients into the prepared pan:
  •  3 cups all-purpose flour
  •  2 cups sugar
  •  1/2 cup baking cocoa
  •  1 teaspoon salt
  •  2 teaspoons baking soda
Make 3 holes in the dry ingredients pour 3/4 cup vegetable oil in one hole, 2 teaspoons of white vinegar in the second hole and 1 teaspoon vanilla in the third hole.  Now pour 2 cups of cold water over the entire ingredients and mix well with a fork until thoroughly blended.  Now is the time to add 1 cup of Peanut Butter chips to the batter.
 
Bake at 350 degrees for 35 to 40 minutes or until a cake tester inserted in the middle comes out clean.  When making cupcakes, I bake my cupcakes for about 15 - 17 minutes at 350 degrees.
 
Frost with your favorite icing. 
Recipe will yield approximate 2 dozen cupcakes too, depending on their size.


Until next time,
 
Cheers!


Follow my blog with Bloglovin


I was featured at:


Dear Creatives


Some of my favorite online blog hop parties I like to share at:
 
 Clever Chicks Blog Hop, FoodySchmoody Tuesday Tastings,  Delish Dessert Link Party, Share your stuff Tuesdays, Anyonita Nibbles Tasty Tuesday'sShare it One More Time, Much Ado About MondayFeathered Nest Fridays, DIY Vintage Chic FridayThe Style Sisters Centerpiece Wednesday, Sew-Off Saturday Sew Can She , Brag about it Tuesday BeBetsy , Shabby Art Boutique Shabbilicious Friday , Give Me The Goods Monday , Homestead Barn Hop , Whimsy Wednesday , Knick Of Time , Hickory Trail , Make the Scene Monday (at Alderberry Hill), From the Farm Blog Hop , A Peek Into My Paradise , A Delightsome Life , Share your Cup Thursday Have a Daily Cup, Homework , Green Willow Pond , A Stroll Thru Life , Work It Wednesday , Savvy Southern Style , I Should Be Mopping the Floors , Common Ground Be Inspired , Simple and Sweet Fridays , Frugal Fit Family Friday Follow Along , Sweet and Savory Sunday This Gal Cooks Marvelous Mondays , This Silly Girl's Life, Living Better Together TGIF Linkparty , DIY Sunday Showcase , Dear Creatives Inspiration, Super Saturday Link Party


Tuesday, January 14, 2014

Happy New Year!

We're midway through the first month of 2014 and I've been remiss in sending out my sincere and warm greetings and wishes for a very happy and healthy New Year to you.  The Mister and I are looking forward to seeing what new experiences and adventures will unfold this year.  If all goes as we hope, it is going to be a VERY exciting year.


One thing I've been doing a lot of lately is going through my crafting supplies.  Having done a tremendous amount of sewing during December I have found myself with quite the upheaval in my craft and sewing room.  Time to clean!  I haven't inked up a stamp in months and once everything was put away and the room tidy I was inspired to play with some stamps.  Thus, today's card.  I've had this adorable dragon stamp for a couple years but hadn't used it.  Time to rectify the situation!

Card Recipe:

Stamps: The Stamp Barn (Heather's Stamping Haven CHSH 112M) and Papertrey Ink
Cardstock and papers: Cardstock is Stampin' Up! the the Design Paper is from K & Company
Ink:  Memento Tuxedo Black and Memento Bamboo Leaves Green
Image Colored: Coloring with a combination of Prismacolor Pencils and a few Copic Markers.
Tools and Accessories: Cuttlebug circles embossing folder, Vellum for the wings, Green and yellow Stickles glitter, Prima Flowers,


This week's MOJO Monday #328 (below) provided the layout inspiration:


This was so much fun to put together.  I haven't stamped or made cards in such a long time and I've missed it.

Until next time,
 
Cheers!