Wednesday, June 30, 2010

North American Holiday Weekend Picnic Bowl Covers

Beginning tomorrow, July 1st, and extending through Sunday, July 4th, it is North America's traditional celebratory holiday picnic weekend. In Canada we celebrate CANADA DAY on July 1st and in the United States of America on July 4th we celebrate INDEPENDENCE DAY. Both holidays are celebrated much the same way and that includes picnics!

I may be dating myself but I have to ask you if you remember your mother and grandmothers using the elastic bowl covers? Back in the 50's and 60's every household had the ubiquitous bowl covers that were plastic with elastic around the edges. They also doubled as shower caps in a pinch. Then came the advent of plastic wrap on rolls and tupperware lids that would "burp" when sealed. No longer do we see the old fashioned bowl covers. But if you get tired of filling land fills with plastic wrap and want to cover your bowls with some fashion, fun and flair I have a very fast project for you to take to your next picnic.

These fun bowl covers take just minutes to create. They are completely washable so no more plastic in the land fills.

How fun it will be to arrive at your next picnic, church potluck or family reunion carrying your favorite pie, potato salad or bowl of snack food covered in a stylish top. It will keep the flies off your yummy treats until the feasting begins.
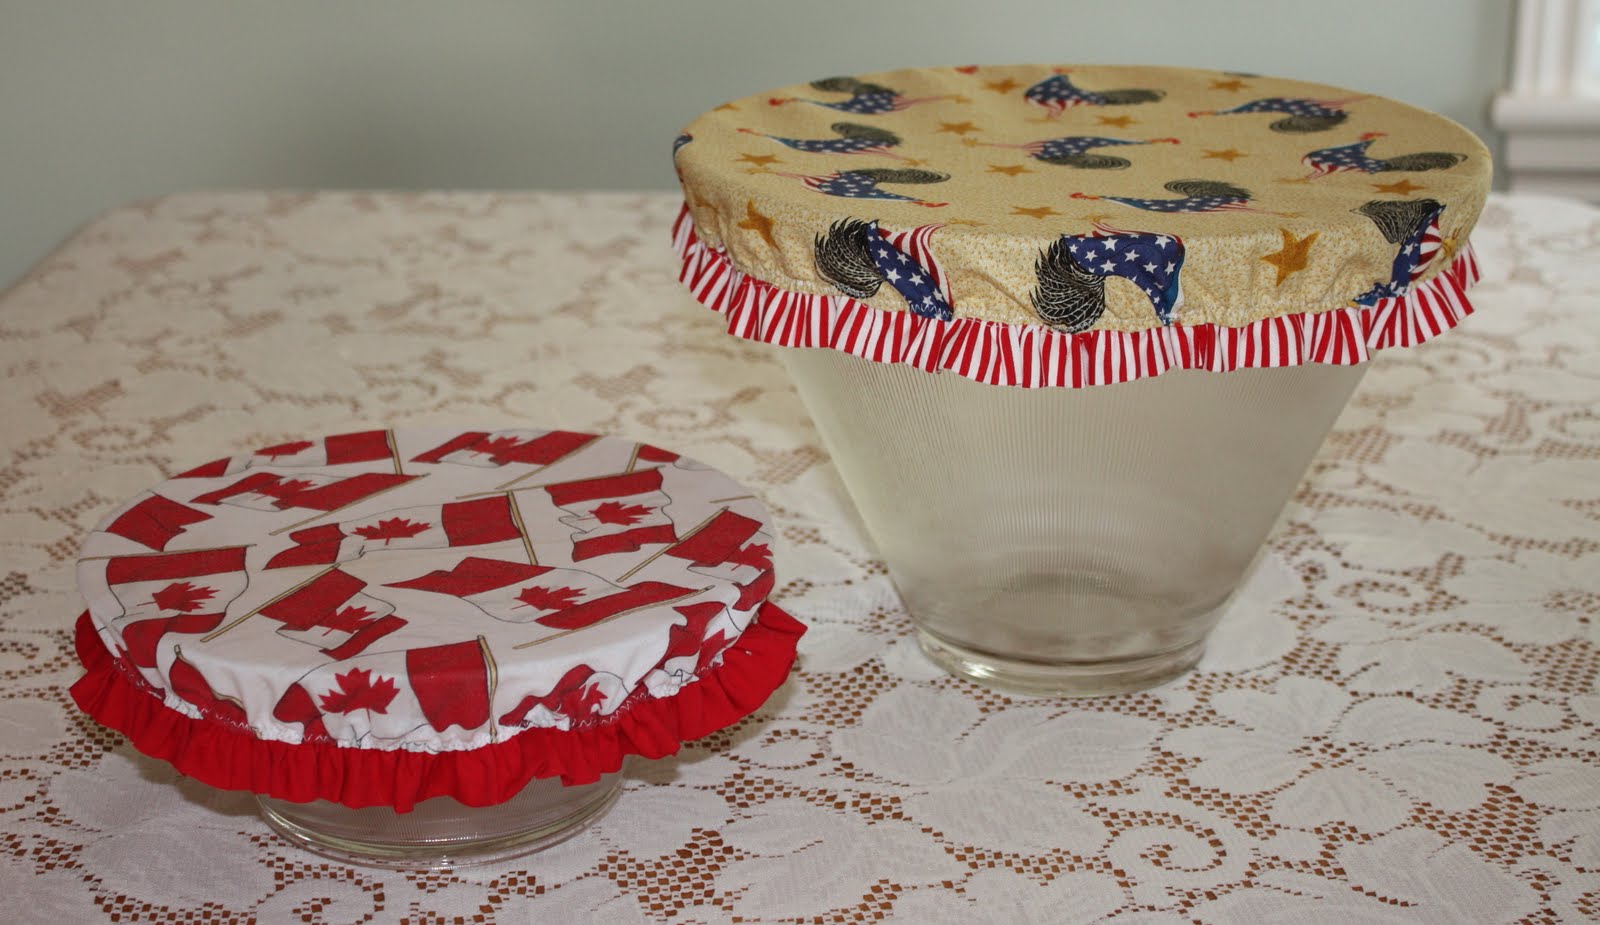
Since my household is a joint Canadian and American household I wanted to make sure our bowls were covered in dual citizenship flags.

I know...you are probably thinking to yourself, "But Jennifer, they aren't airtight." That is true, but they will keep the bugs and flies away from your food, they are ecologically friendly and they are just too cute. Come on...you know it's fun to add a splash of Canadiana and/or Americana to your table setting.

So if you are interested in spending 30 minutes making a set of these they are as easy as pie to create. Trace directly onto the wrong side of your fabric around the top of your bowls, cake pans, pie plates...any serving bowls you wish to use. Then add an extra two inches to that circumference and cut it out. Grab a contrasting or complimentary colored double fold bias tape and sew it to the raw edge of the circle. Instead of bias tape I made a very fast ruffle. They both serve the same purpose in adding an edge. Last step: (see, it is almost finished already) on the inside edge of your ruffle or bias tape, zigzag stitch 1/4" elastic being sure to pull and stretch it as you stitch. THAT'S IT! You are finished.

Just think of how fun these covers can be for other holidays (Halloween popcorn bowls and Christmas party covers using seasonal fabric.) Or perhaps make yourself a set complimenting your kitchen decor and colors.
As you can see my bowls are empty so I need to get into the kitchen and get busy making our picnic food.

I'm wishing you a happy and festive holiday weekend whether you are celebrating Canada Day tomorrow or Independence Day on Sunday.

Cheers!

Jennifer

Tuesday, June 29, 2010

Garden Glove

In keeping with the theme of my garden and the ground hog that is welcoming himself to a smorgasbord of vegetables, I made this thank you card for a gardening friend of mine who has a wonderful garden of her own and I do not think she's plagued by ground hogs.

Card Recipe:

Stamps: The Thank you sentiment and floral garden glove are from Serendipity Stamps
Ink: Image stamped with Momento Tuxedo Black and image colored with Copic Markers
Paper: The plaid background paper is from Michaels (manufacturer unknown)
Accessories: Stickles, Machine stitching Nestibilities dies, ribbon from my stash

Now tell me if you notice something very odd and done incorrectly about this card. YIKES! I don't know where my mind has gone. Do you see my error? I'm hoping not, but I'm sure someone will pick up on it.

Thanks for dropping by.

Jennifer

UPDATE: Several people asked what I was talking about it wrong. I mounted the image upside down. YIKES! The flowers are supposed to be growing out of the glove sleeve. I was so intent on lining up the image straight that I didn't look to see that I was holding it upside down. And let me tell you, when they say the glue is permanent...it is!

The garden and the groundhog

Here he is. Meet Mr. Groundhog. He and I have been doing battle ever since I planted my vegetable garden. He's out there and is waiting for me to replant more vegetables for him to consume. He is my arch enemy number one: Mr. Groundhog

He sits and waits in the grass, thinking I don't see him. He's wrong! There you are Mr. Groundhog!


Some days, just to add insult to injury, Mr. Groundhog waves and says, what are you going to plant for me to eat today?


This WAS going to be one of my broccoli plants. He didn't even wait for the delicious, green vegetable to mature before destroying all of my plants. I replanted. He ate them all again.

And this was supposed to grow into delicious cucumbers. HA! Not a chance now. So I replanted. And again he feasted..........

Sometimes he just waddles around in the tall grasses in the field behind our back fence...waiting.....watching.

With a fully belly he waves goodbye to take a nap in his hole. Just waiting for his next meal.

Saturday, June 26, 2010

Roly Poly Daisy Girl

Isn't she just a hoot? This is one of three Roly Polys, created by Sunshine Designs and manufactured at The Stamp Barn, that I bought a year ago. I just think they are just the most fun quasi-children images.

See the ladybug on her leg?

Card Recipe:

Stamp: CSD079L Roly Poly by Sunshine Designs (THE STAMP BARN)
Paper: Cardstock is Stampin' Up! Designer Paper is K & Company
Ink: Momento Tuxedo Black. Image colored with Copic Markers
Accessories: Nestibilities daisy flower die, jute, gold faux gemstone, stickles, foam tape

I hope you are having a fun filled, sunshiney, lazy-daisy kind of summer weekend.

Cheers!

Jennifer

Friday, June 25, 2010

Heard you had a RUFF day !!


Another Newfoundland dog owner friend of mine had quite a serious scare recently when her Newfie contracted a very, very serious illness and underwent surgery. Miracles do happen and while her dog is not completely out of the woods yet, he is doing much, MUCH better and each day looks more positive for him. I was afraid I was going to have to make pet sympathy card to send but I'm happy to report that I was able to send a much more uplifting thinking of you card using this silly pup surrounded by flowers and "goofy Newfie-ness" expressions of joy that he's getting better.

Hug and pat your pet today. Each day is precious!

Cheers!

Jennifer

Thursday, June 24, 2010

Punches and mindless paper punching.

This card just screams for the sentiment, "You're HOW OLD?" or something along those lines. It is just a fun card for the dog lover.

What prompted this card in these colors especially was just my typical fooling around with paper. I've been looking for, for the LONGEST time, a border punch with paw prints. I know there is one out there somewhere but I can't find it. I do have this small paw print punch that will punch individual paws. So there I sat, watching it rain outside and with a scrap of yellow cardstock in hand I started punching. (Paper punching can be as mindless and addictive a popping bubble wrap). At first I just couldn't line the punches up evenly. Then the lightbulb went on (sometimes I'm soooooooo slow) and I measured the dimension of the paw and marked on the edge of the cardstock one inch intervals and figured if I punched with the edge lined up directly on the line of each inch I'd get evenly spaced and properly distanced paws. VOILA! That worked nicely but it looked kind of plain. Hmmm...still sitting at my table happily and mindlessly punching paper and watching the rainfall I decided I'd try using a scallop border punch just beneath the paws. Looking good! So now can I manage to punch above the paws and scallop evenly. After a couple of trimming of the cardstock I managed to get a fairly evenly spaced border.

Now I have the paw punch border but no card to go use it on and we just can't have, can we? This dog stamp is from Eat Cake Graphics and the good Lord only knows how many times I've used this stamp over the years. I just love his goofy expression. So I stamped and colored him, punched him out with my Nestibilities oval dies. The patterned paper is one of my favorite K & Company designer papers. The pad comes with an array of bright and bold colors in florals and design patterns.

So there you have a long, wordy explanation of how this silly card came to be. Even the ribbon loops on the side were just 6 inch reminents of ribbon that were too short to make into a bow but just right for adding loops to the sides.

I haven't decide precisely what the occasion I'll use this card for. New puppy card, perhaps? Birthday for a dog lover? Hmmmm...?

Until next time,

Cheers!

Jennifer

Wednesday, June 23, 2010

A Lavender Birthday Card

In an attempt to tie together my Lavender sachet and jar topper as a gift, I wanted to make a birthday card as part of the set.

Once again I've used the same stamp (Stampin' Up's Herb Expressions) and stamped it on ivory cardstock and then added Flower Soft product to the blooms. This card is a very simple card and I wanted to bring out a little 3-D by attaching a bouquet of faux lavender tied in a dotted lavender colored ribbon.

To make the lavender bouquet I just cut three 3 inch pieces of wire and covered the end of the wire about 3/4 of an inch up the wire with glue and then rolled the glue-y end of the wire in lavender flowersoft and let it dry. In order to keep the wires standing upright while they dry I poked the wire ends into a dry sponge and let that sit on the table to dry.

To carry out the inside of the card with more lavender and the birthday greeting I used this sweet vine border. It is one of the stamps in the Stampin' Up! Long Time Friend set. The Happy Birthday sentiment is also from Stampin' Up!


I used my cuttlebug swiss dots embossing folder on the outside of the card and also punched a eyelet scalloped border with a Martha Stewart border punch.

And this completes my lavender gift set.

Cheers!

Jennifer

Monday, June 21, 2010

Stamping, stitching and more lavender

I'm still having a lot of fun discovering new ways to present my dried lavender. Today I want to show you a little gift jar I've made which uses rubber stamps (the Stampin' Up! Herb Expressions set), some stitching on Aida cloth, my scalloped circle Nestibilities die, ribbon, felt and a baby food jar.

I love it when I can find ways to combine different hobbies and this little jar topper let me use my stamps on fabric to use as an outline for the image I wanted to stitch.


So let's start at the beginning. When we last left off, I was drying some lavender from the rafters in the basement.
Step 2: While we wait for the lavender to dry take a piece of Aida cloth or any even weave fabric. I would have prefered to have used linen, but sadly I was out of it. Cut the fabric in a size a bit larger than your image will cover. You want to have room to stuff and attach your piece to the lid once it is stitched.

Step 3: I used StazOn ink and the Herb Expressions Lavender stamp. Ink up your stamp and carefully place and stamp on the fabric. You'll want to use a bit more pressure and hold the inked stamp a bit longer than you normally would on paper just to be sure it soaks into the fabric neatly.

And here is the cloth with my pattern, created from the stamp. It doesn't matter if it is a little light in places (notice the lavender isn't completely inked). Once you begin filling in the image with stitches you won't see the ink any longer.

Step 4: Let's begin stitching. I used a combination of French knots for the lavender and backstitch for the vines. And what do you call the stitch for the leaves? Is that a lazy-dazy stitch? I forget.......

Now go ahead and finish your stitching. It is such a small area that it takes only one television program to complete. Yes, I stitch while watching (correction: listen to) TV. I believe it was America's got Talent that evening.

Step 5: Now that you've completed your stitching it is time to get the pieces together for the lid. I used my scalloped circle Nestibilities die and ran it through the cuttlebug on a piece of bright blue felt. Nestibilities dies cut great through felt and fabric.

Step 6: You're ready to finish the jar topper (lid). I cut a circle of chipboard the size of the lid, placed cotton balls for puffyness and then stretched my completed stitched piece over it.

Step 7: Glue the felt to the metal baby food jar lid. Be careful to center it exacly so the scallops will overhang evenly. Wrap the rim with ribbon and attach a bow.

Step 8: It is time to finish this little project. I glued the stitched and stuffed piece to the blue felt jar lid.

And there you have it! A completed jar topper.

I thought this might be a fast and fun way to give small gift jars of lavender. Or, you can just use it to store the lavender in for yourself.

From garden to rubber stamping to sewing to craft project; this jar topper kept many of my hobbies in harmony.

If you enjoy quick embroidery projects, look through your rubber stamps for images with small enough for the lid and one that is primarily outlines would be best to transform into a sewn project. I think it would be fun to use a strawberry, raspberry or peach stamp and stitch it and use it to cover jam or jelly jar lids with the stamped and stitched piece.

Cheers!

Jennifer

Sunday, June 20, 2010

Happy Father's Day

Happy Father's Day to all of the great dads in the world. My father is no longer with us and I miss him something awful. I find Father's day a very melancholic day for me. But, I wanted to share today a father's day video and photos of my horse, Gypsy. When I was a little girl I always asked my dad if I could have a horse and he always responded the same way saying, "Jennifer, I will get you a horse as soon as we move to a place where we can keep a horse." Well, Dad never broke his promise. It was just that we never moved from the city. He died in the house in which we'd always lived. But last fall, I was finally able to realize my lifelong dream to have a horse.

Meet my Gypsy. Gypsy is 100% Canadian. She is 12 years old (soon to turn 13). She is the most gentle, wonderful horse this old gray mare could ever dream of.

So here is a video of this Father's Day evening spent with the Gypsy mare.


I was at the barn alone so unfortunately I had to keep Gypsy in the cross ties while I photographed. She'd have looked more beautiful if we'd been outside...but then I'd have been chasing about trying to capture her best side! LOL

I always say that the Gypsy mare has the most beautiful horse's patootie I've ever seen!

I love my mare!


Gypsy is wondering when I'm going to give her more apples and carrots.

Now she's asking to puleeeeeeeeeeease hurry up with the photo shoot and get me out of the cross ties!

So as my tribute to Father's Day I present how I spent this evening. Just me and the Gypsy. I know my Father would be so happy to know I finally got to have my horse I'd always dreamed of. I also think that he would have loved her just as I do too.

Cheers!

Jennifer


Update!

I'm so excited and just had to share and give my blogging friends an explanation about why in my last post about the Lavender Sachets that the photos have been removed and replaced with the sign "removed for Publication."

I had no idea anyone really looks at my work from publication community but lo and behold the editor of Scrapbooking.com saw my lavender sachets in a gallery and sent me an email asking if they could use my work in the August issue. Of course I was totally floored and flattered and said YES!

Consequently, I've had to remove the photos of the lavender sachets until the publication comes out in August. I will, of course, let you know and link you to the publication when it is visible.

I'm just bustin' my buttons! This is the first time I've ever been published!

Cheers!

Jennifer

Thursday, June 17, 2010

Lavender Tea Bag Sachet

Are you ready for another installment in my "fun with Lavender" series? hee hee. I guess you could say that today I've gone from SORBET to SACHETs! I really am enjoying doing different things with my lavender and today I have a little craft/sewing/stamping project to share. Using a pale blue colored organza, folding and pressing it into a teabag, sewing the seams, stamping an image of lavender and attaching a tag, I've made a quick tuck in gift for a card, or a table favor at tea with friends. This lavender tea bag sachet smells delightful using dried lavender buds and will make a nice smelling lingerie drawer sachet or to tuck in for your purse or handbag to keep it sweet and fresh smelling.

From the garden to crafting and cooking, this is largest part of the fun for me when I grow herbs, vegetables and flowers: discovering how many ways to incorporate the produce into daily uses. Even if I never harvested the lavender for other purposes though, isn't it pretty growing?


Then going outside with basket in hand I cut fresh lavender and began bunching it for drying.

Drying lavender should be done in a cool, dark and dry area. I'm not an expert but I'm happy to share how I do it. I take small rubberbands and band together small bunches of the lavender. I have some chain that I hang from a nail in the basement rafters. To the chain I attach the bunches of lavender at different levels around the chain. When drying any herb you want to be sure that the air can circulate all around the drying herb (lavender, in this case) so be sure that your bunches of lavender are not laying on top of each other. I use quite a number of chain lengths to dry the herbs so that they have plenty of room to dry properly.

And now to today's very FAST and simple craft project. I should mention immediately that the lavender I used in today's project is my lavender that I dried last year. It will be several weeks before the lavender I just harvested in the above photos will be dried for use.


Using a piece of organza I folded and pressed the organza into the shape of a tea bag. Using a very tiny french seam, I sewed my teabag together so that now it was open at both ends. Using my Stampin' Up! stamp set called "Herb Expressions" I stamped the organza using STAZON Royal Purple and STAZON Forest Green solvent ink. Be sure to put a piece of recycled computer paper or newspaper under the organza when you stamp so that if there is bleed through you won't ruin your tabletop.

Next I filled the organza tube with a tablespoon or two of dried lavender (from last year's harvest). If you want to refresh your lavender you can add a drop of lavender oil to it. I did not need to do this as my lavender is still fragrant, but it is always an option.

Now I was ready to bring both ends together, fold over and stitch the top, attaching the tag to it...just like a regular teabag.
The possibilities for these teabag sachets are endless if you grow your own herbs. You can combine many different herbs creating lovely smelling sachets.

I hope you aren't tired of my Lavender posts yet, because I still have some more uses for it.

Cheers!

Jennifer

Tuesday, June 15, 2010

Lavender Sorbet

Sweet! Refreshing! Frosty! That is how I would describe Lavender Sorbet. This simple sorbet is made using minimal ingredients but it is large on flavor and was a huge hit as our dessert last night.

Cooking with flowers is not something I've done a lot of. I had the misguided notion that flowers in food would be perfume-y in flavor. Not something I'd want in a dish. True, I've eaten batter fried squash blossoms and have had pansies in salad, but not too much more than that. Well! This Lavender Sorbet is not only very flavorful it is very, very refreshing.

Have I piqued your interest? Come join me and let's cook with flowers.


Remember yesterday I left you as I headed out to harvest some lavender. I've hung most of this basket in the basement for drying but decided to pull out some of the fresh lavender to use in the sorbet.

The ingredients are very simple and minimal. I decided to add pansies too for their color though you do not have to.

Let's get started:

Add sugar to water on the stovetop.

Simmer the sugar/water mixture for about 5 minutes.

Place the lavender in the food processer with a little sugar.

Isn't it pretty?

But after processing the sugar and lavender for about 3 minutes this is what it looks like. Not as pretty but that's ok. We'll now add the lavender/sugar mixture of the processor bowl to the sugar water mixture on the stove.

Stir and combine very well and let this rest for an hour to cool.

Once it has cooled be sure to strain it through a fine stainer. You'll be left with the lavender infused sugar water and the plants bits will be removed.
Now it is time to add the pansies. First place the pansies in a little boiling water in a bowl and let them steep for 15 minutes. Then pour through cheesecloth.

See the color you've gotten from the pansies?

Drip...drip...drip....it is natural purple dye.

Now we're getting serious. I added about 2 tablespoons of tequilla. You can add plain vodka or any type of alcohol you'd like. The reason for a small amount of alcohol is that alcohol does not freeze so its addition to your sorbet will keep it from freezing to ice once you are ready to chill the dessert. It WILL be frosty but will not freeze hard like an ice cube.

Final ingredient added: the lime juice. Now stir your mixture well and place in a freezer safe dish and chill. When it is almost frozen I put the icy mixture in the food processor and re-processed and then put it in my serving dishes and froze one last time. This makes a really nice smooth sorbet.

Look how pretty! I garnished with some more pansies but you could just as easily garnish with sprigs of lavender (which probably makes more sense since this IS Lavender sorbet!)

I sort of combined three different recipes I'd seen to come up with my own version using the simplest of ingredients. It is so easy to put together and you can make this up to three days in advance so if you have guests coming over and you can be prepared well in advance.

Lavender Sorbet
1 cup granulated sugar
2 cups water
1/4 cup fresh lavender flowers(food grade) (use 2 tablespoons of dried lavender if you don't have fresh lavender)
1/2 cup pansies (purple petunias or violets can be used too)
juice of one lime
2 tablespoons tequilla (or vodka) - optional

In a medium saucepan combine sugar and water until the sugar dissolves and simmers for about 5 minutes. Put the lavender and 1/4 cup of sugar in the food processor (or blender) and process for 3 minutes or until the flowers and sugar are completely blended.

Add the lavender mixture to the saucepan and cobine well and then let it stand for at least an hour. Strain the mixture and set it aside.

Bring 1/2 cup of water to a boil and pour it over the pansies and let the pansey/water steep for 15 minutes. Stir it occasionally.

Strain the pansey through cheesecloth and then squeeze the cheesecloth to release as much color as possible.

Blend the pansey water into the lavender syrup that you have previously set aside.

Add the tequilla and lime juice.

Place the mixture in a freezer safe contain and chill. Once it becomes frosty/icey put it back in the food processor (or blender) and re-process until smooth and then pour into serving dishes and put back into the freezer to freeze.

Can be made up to three days in advance.

Bon Appetit!

Jennifer