Friday, December 17, 2010

Stocking stuffer idea: Teabag Pouch

I wanted to make and give some small gifties from the heart, but with the time drawing near for Christmas giving, what could I make quickly and easily and yet would be from the heart and useful? Suddenly it hit me! A teabag pouch that one can throw in the purse, bag, glovebox or tote. A hot cup of tea always at hand for the recipient.

There are many tutorials for teabag pouches (carriers) on the internet and I liked them but decided to tweek some of the ideas and came up with my own version. The simplicity and ease to make these became a bit addictive as I put them together. All you need to make my version is:

1 FAT QUARTER of your favorite fabric
1 button
Trim (I used rickrack but this is totally optional)
thread
sewing machine

And once folded and buttoned up, the pouch fits in the palm of your hand containing your favorite tea and room for sweetener if you like, too. Below is a photo of it opened out displaying your tea.

Select your tea of choice and then fold the right side to the middle.

Next, fold over the left side like this: (below)

Then flip up the bottom and button it shut! (below) VIOLA! Your tea literally at hand as it fits in the palm of your hand.

If you are interested in a pictorial tutorial showing the sewing process, let me know in the comments and the next one I make I'll put together a tutorial.

Now, I'd better wrap these up quickly for some gift giving this weekend.

Cheers!

Jennifer

Friday, December 10, 2010

It's a holiday time giveaway!


Each year SEW MAMA SEW holds its annual HOLIDAY GIVE AWAY and I'm delighted to announce that I am participating with a giveaway item:

My ALICE TOTE BAG


All you need to do for your chance to win this tote is to leave me a comment on this post telling why you'd like to win it. It is as simple as that! You'll have until midnight eastern time on December 17th to leave ONE comment here for your opportunity to win. I'll use the random number generator to choose the winner and will mail the tote to the winner on Monday December 20th. (International entries are welcome to join in!) PLEASE BE SURE THAT IN YOUR COMMENT THAT YOU LEAVE ME YOUR EMAIL ADDRESS OR A MEANS TO CONTACT YOU IF YOU ARE THE WINNER.


And be sure to check out the Sew Mama Sew blog post regarding the Holiday give away, click right here on SEW MAMA SEW to take you to the site and see the bloghop. There are three categories of giveaways including: Giveaway Day ~ Sewing + Knitting Supplies/Materials, Giveaway Day ~ Handcrafted Item(s) + Supplies/Materials, and Giveaway Day ~ Handcrafted Item(s)

Have fun on the blog hop for holiday time giveaway!

Cheers!

Jennifer

Tuesday, December 7, 2010

Peace on Earth and Mercy Mild

Hark the herald angels sing
"Glory to the newborn King!"
Peace on earth and mercy mild
God and sinners reconciled.

Joyful, all ye nations rise
Join the triumph of the skies.
With the angelic host proclaim:
Christ is born in Bethlehem

Hark! The herald angels sing
"Glory to the newborn King!
"


I made a lot of these 'snow globe' shaker cards this year using the PEACE ON EARTH cling set from SERENDIPITY STAMPS. The inside is stamped with the sentiment, "Peace on Earth."

While shaker cards aren't difficult, they do require a few steps to the production and making approximately 25 of these I wasn't sure if it was do-able. As it turned out, it was indeed do-able and actually a lot of fun. I set up a production line of the assembly order so that once I had all of the individual components stamped and cut out and the embellishments ready and set out on my work table, I simply circled the table assembling one step at a time. I was surprised how quickly a large batch of these went together once I was organized.

Using the larges Scalloped Circle Nestibility die I cut my white cardstock base on a folded A2 card size (4 1/4" X 5 1/2"). Being sure that there was a bit of the fold that would NOT be cut by the scallops so that I'd have a card to open. I used a Stampin' Up! punch for the "ornament top" - I'm not sure what the punch is called but it looks like a fold tab punch.

For the image I used Stazon black ink and stamped the image on clear transparency film. I colored the backside of the image with Sharpie permanent ink pens. Then on top I added some glitz and sparkle with Silver and Red Stickles glitter.

Once dry it is time to assemble. I used the largest circle die and cut out the transparency film as well as a plain white cardstock circle which would be used as the base of the "globe". Next, and probably the tricky-est part, I cut long strips (about 1/8th of an inch wide) of foam tape. Attaching the foam tap around the perimeter of the plain white cardstock base and then filling the center with "snow" and then carefully covering the top with the transparency film that has been already colored. This "disk" I attached to the scalloped cardbase. Then using two circle dies nested together I cut the RED circle that surrounds the globe and adhered it to the top of the transparency film. This covers the sight of the foam tap beneath as well as providing color.

Finally, I added the bows at the top and a silver cord for hanging.

I realized, too, an error I made and didn't notice it until after I photographed this particular card. Do you see my mistake? I missed coloring one little section of the red ribbon surrounding the earth. Not to worry, I fixed that mistake before mailing the card! I'm so glad I discovered my "OOPS!" before I'd sent the card out.

Cheers!
Jennifer

Friday, December 3, 2010

Santa Claus is coming to town

"You better watch out.
You better not cry.
Better not pout I'm telling you why,
Santa Claus is coming to town.

He's making a list
And checking it twice;
Gonna find out who's naughty and nice.
Santa Claus is coming to town."


One of my all time favorite and highly prized stamps in my stamp collection is the original Gumball Graphics Santa stamp. And it is true, I use it for at least some of my cards every year, though I try not to send a card with this image to the same people each year. *wink* To me, there have been many wonderful Santa Claus interpretations but none come close to this particular image. I do consider myself fortunate to have been able to purchase this stamp before it disappeared.

Much to my husband's delight, I have made a concerted effort to keep this year's cards flat...or as best as I could not too bulky with embellishments soas not to have to mail with double the postage. My dear daughter claims she always knows when she's receiving a handmade card by me because, as she calls them, they are FAT CARDS, meaning the envelopes are huge and puffy. Well, not this year.

For this card I used the snowflake embossing folder and ran it through my Cuttlebug for the cardbase to create the snowflake background and then randomly added a tiny hint of glitter to the snowflakes to make them sparkle. Mr. Claus's image is mounted on royal blue metalic cardstock. I colored him with a few copic markers and added a bit of sparkle to his beard, hair and eyebrows with a sparkly Sakura Gelly Roll pen. I love using this pen. It doesn't add any color but the sparkle does subtley catch the light.

I punched a few snowflakes with a Martha Stewart snowflake punch and added ultra fine blue and crystal glitter to them. Then a thin silver cord on the side with a bow to finish it off. I really enjoy the blue, silver and white combo for Christmas!

These were fun to put together. I'm going to make some small gift tags for presents using the Gumball Graphics Santa stamp. He's such a jolly old elf, don't you think?

Until later,
Cheers!

Jennifer

Thursday, December 2, 2010

Sleigh Ride

"Just hear those sleigh bells jingle-ing
Ring, ting, tingle-ing too.
Come on it's lovely weather
For a sleigh ride together with you."

FINALLY! I'm making my Christmas cards. I could hardly wait to ink up this stamp by Impression Obsession with the two beautiful draft horses and I'll be sending these to my horse loving family and friends this Christmas.


It has been so long since I've made a lot of cards I had to rediscover and reintroduce myself to my stamps, inks, papers, ribbons and embellishments. Seriously! Once I got started, though, I began finding tools and supplies I'd forgotten I had.

I stamped the image with Versafine Onyx black ink and embossed it with clear embossing powder. I didn't want to fuss too much with coloring the horses since the stamp is highly detailed. Of course, as you already know, my horse is black so I decided these two should be black as well so I added a bit of grey copic markers to the horses for highlights but otherwise kept it simple.

The wreath surrounding the horses was fun to embellish. I added Christmas green flower soft product to the wreath and the berries are dots of Christmas red stickles to make them glitter.

The background paper is some very old Anna Griffin Christmas paper that I had in my stash. I love this holly berry paper and decided that I should quit hoarding it and use it this year on some cards.

It has felt SO GOOD to be stamping and cardmaking again after a long summer busyily doing other hobbies. I've promised myself to be better in the new year to come to work on my card supply and send more cards. Emailed messages are so quick and easy and keeping in touch via facebook, email and texting has some advantages, I'm sure. But what more of a gift can you give someone than to send a handwritten note and card from time to time to remind that person of how much you care. So there is my resolution for 2011: stay in touch with family and friends with a snailmailed gift of love.

This is not the only Christmas card design I've made so more will come. I've had a regular production line going.

Until next time,

Cheers!

Jennifer

Wednesday, November 17, 2010

Beatrix Potter, Bunnies, Books and Baby Shower Gifts.

Recently I was invited to a baby shower and tucked in with the invitation was a note stating that it would be wonderful and well appreciated if the attendees would like to contribute (in story book form) to the new baby's library. What a fabulous theme/idea for a baby shower!

And hurray! I finally got my stamps, ink and cardstock out to make a baby shower card!

For the card I used Stampabilities, "Tall Tales" which is one of the Happy Hopper line of House Mouse stamps. Since we don't know the gender of the baby yet I wanted to keep the card non-gender specific and simple. The "Tall Tales" stamp fit perfectly with the baby shower's theme.

For the baby's gift of a book for the library I knew immediately that I wanted to make a cloth book (fabric book). I recently found a number of different cloth book panels and ordered some to make some books. Since I've always had a fondness for Beatrix Potter, her artwork and delightful stories, I chose this adaptation of Beatrix Potter's "Tale of Benjamin Bunny."


Of course I had to play with the book and read it over and over before I wrapped it and sent it off. I sure wish I could be cuddling the little one and reading to him/her but for now, this video is my only means to read it to the baby.


If you have never seen book panels before, this is what they look like when you buy them. I have three other stories to make into books:


The books go together quickly and basically you cut out panels, back them with either flat batting (which I used) or medium weight pellon woven interfacing to give the pages stability and heft, and then sew them together.

I think I'll get a bit more creative with my next cloth book and perhaps put piping on the book edges and/or do some quilting on them.

So that is my take on Books and Bunnies and Baby Showers and, of course, Beatric Potter.

Until next time,
Cheers!
Jennifer

Monday, November 15, 2010

I have an Etsy shop !


Good morning, my friends!

After a long time of hemming and hawing about it, I finally opened my own shop on Etsy! I'm really excited about it too. I have some fun plans for my shop in the future, though that does (of course!) depend upon how well the shop is received. My shop name is INKINUPSTAMPS. If you click on the present icon above it should take you directly to my shop. I've also added an Etsy badge on my sidebar that will take you there as well.

My blog, here at Thimbles, Bobbins, Paper and Ink, will remain my blog where I'll continue to post about stamping and card creations, fiber arts that I'm working on, my critters and garden and what I'm reading.......none of that will change. So I hope you'll continue to visit here. I've really grown to care about my blog followers. You are such a wonderful group of online friends that without the magic of cyberspace, I may never have gotten to know you.

For the past week I've been posting here on my blog my ALICE Totes and EMMA FAYE Totes. Each tote is now available in my Etsy shop.

In the future I'll be adding some children and infant toys/gifts, kitchen apparel (yes, aprons and hotpads/potholders) as well as some fun designs for your four legged furry friends.

So that is my exciting news this morning.

I hope you have a wonderful week. I have not inked up a stamp in ages and my stamps, cardstock and inkpads are calling me, so cardmaking will be the highlight of today, for me (oh yes, and some Monday morning laundry to wash too!)

Until next time!

Cheers!

Jennifer

Sunday, November 14, 2010

Winter Holiday Cardinal Alice Tote

Would you like to see one more ALICE TOTE BAG?
This tote is made from Hoffman Fabric's Holiday Cheer in Black - Small Holiday Cardinals fabric. The subtle gold metalic thread make the cardinals stand out on the branches pine on a black background. The ruffled flounce at the opening of the bag is trimmed in metal gold and back trim giving it a very festive flare.
The inside of the bag is made with Hoffman Fabric Holiday Cheer - Red Pointsettia Scrolls. I've included a zippered pocket adorned with gold metalic trim and a black satin ribbon centered with a gold seed bead. And of course, the bag has a handy key clip attached to satin ribbon to keep your keys easy to find.

This bag is deep and roomy and will easily hold your holiday shopping purchases.

Thanks for stopping by and seeing yet another of my Alice Tote bag.

Cheers!

Jennifer

Thursday, November 11, 2010

Floral Elements Alice Tote

Mustard yellow and bright teal! This Floral Elements Alice Tote is bright and bold and eyecatching.
The outer bag is made from Bari J. Ackerman fabric from the Journal collection. The lining print is a gorgeous fabric from Floral Element Solutions in Teal. I just love the combination of these two prints creating a bag that's as pretty inside as it is on the outside.

A zipper pocket keeps small items easy to find, while the side key clip helps you keep track of your keys. The rest of the bag is big and roomy to hold everything you'll need on your outing.

And like all Alice Totes, this bag has the flirty flounce of a ruffle under the round, sturdy handles. It is feminine and practical and measures approximately 18" wide and 14"tall.

Thanks for taking a peek. One more holiday bag in the Alice design to come.

Cheers!

Jennifer

Dogwood Stripe Alice Tote

Introducing one of my new Alice ruffle, barrel totes made in a lovely Laura Gunn Dogwood Stripe fabric and lined with a yummy milk chocolate brown lining fabric.

As with all Alice Tote Bags, the inside wouldn't be complete without a zippered pocket and a key clip. The Alice tote is deep and roomy, measuring approximately 19" wide at its fullest point and 14" tall. The round handles are sturdy to support the bag's contents without collapsing.

The bag is feminine with a flippy ruffle and yet playful with its blue denim background that will look perfect with your favorite jeans. Playful, feminine and practical...this bag has it all!

Thanks for stopping by. I hope you are enjoying as lovely a day as we are here in the Ottawa valley. It is sunshiney, cool and perfect autumn weather.

Cheers!
Jennifer

Wednesday, November 10, 2010

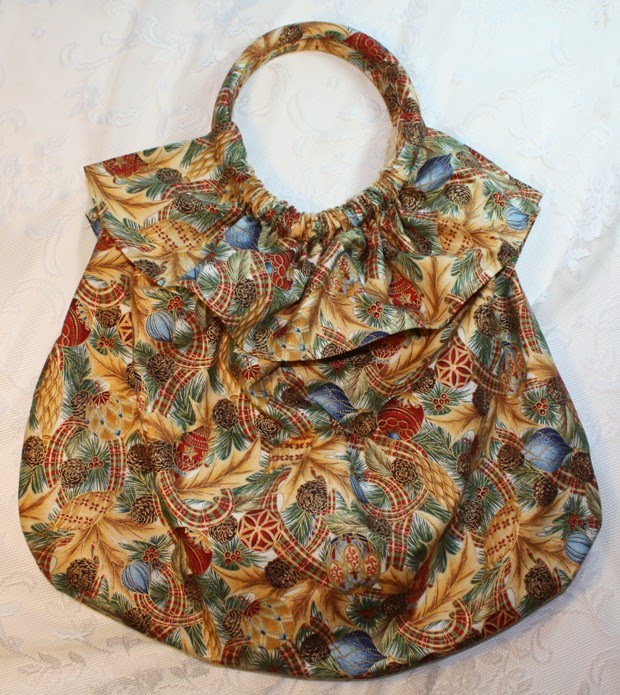
Introducing the Alice Tote

If you've been following along the past few days you've seen the Emma Faye Totes I've been making. Today I want to introduce you to the Alice Tote. The Alice tote is named in honor of my maternal grandmother.

I've been carrying and using a summer print version of this tote all last summer. This barrel tote with a flirty, flippy ruffle top is very roomy. The round handles are sturdy and made from rubber tubing encased in the beautiful Victorian White Pine and Ornaments fabric from RJR fabrics.

Inside this deep bag is a zippered pocket to hold your cell phone or makeup and also attached for your convenience is a key clip on a beautiful gold satin ribbon.

I encourage you to double click the photo to enlarge it and see the beautiful fabric with metalic touches, the pinecones and beautiful blue ornaments.

Thanks for stopping by. Until next time....

Cheers!

Jennifer

Tuesday, November 9, 2010

Christmas Cardinal Emma Faye Tote

Have you begun your holiday shopping? Are you in need of a festive tote or bag to carry your purchases, or perhaps to use as you handbag throughout the holiday season? My Christmas Cardinal Emma Faye Tote may be just what you are looking for.

This tote is made from gorgeous metalic fabrics from Hoffman Fabric Holiday Cheer collection using the Small Holiday Cardinal fabric paired with Holiday Cheer Red Pointsettia Scrolls fabric.

Inside the tote are two pockets detailed with a gold seed bead handsewn inside a satin ribbon bow. And no tote is complete without a key clip to safely hold your keys in place.

On the outside of the bag each pieced square is adorned with a tiny gold seed bead for an addition of sparkle and the top edge of the bag is piped with gold piping trim.


This tote bag measures approximately 13" X 14" and is interfaced with medium weight woven pellon for stability and lined in black satin.

Not too much longer and my Etsy shop will be open for business and the Emma Faye Totes I've shown you the past several days along with the Alice Tote, which I'll introduce tomorrow will be in the shop.

Thanks for stopping by!

Jennifer

Monday, November 8, 2010

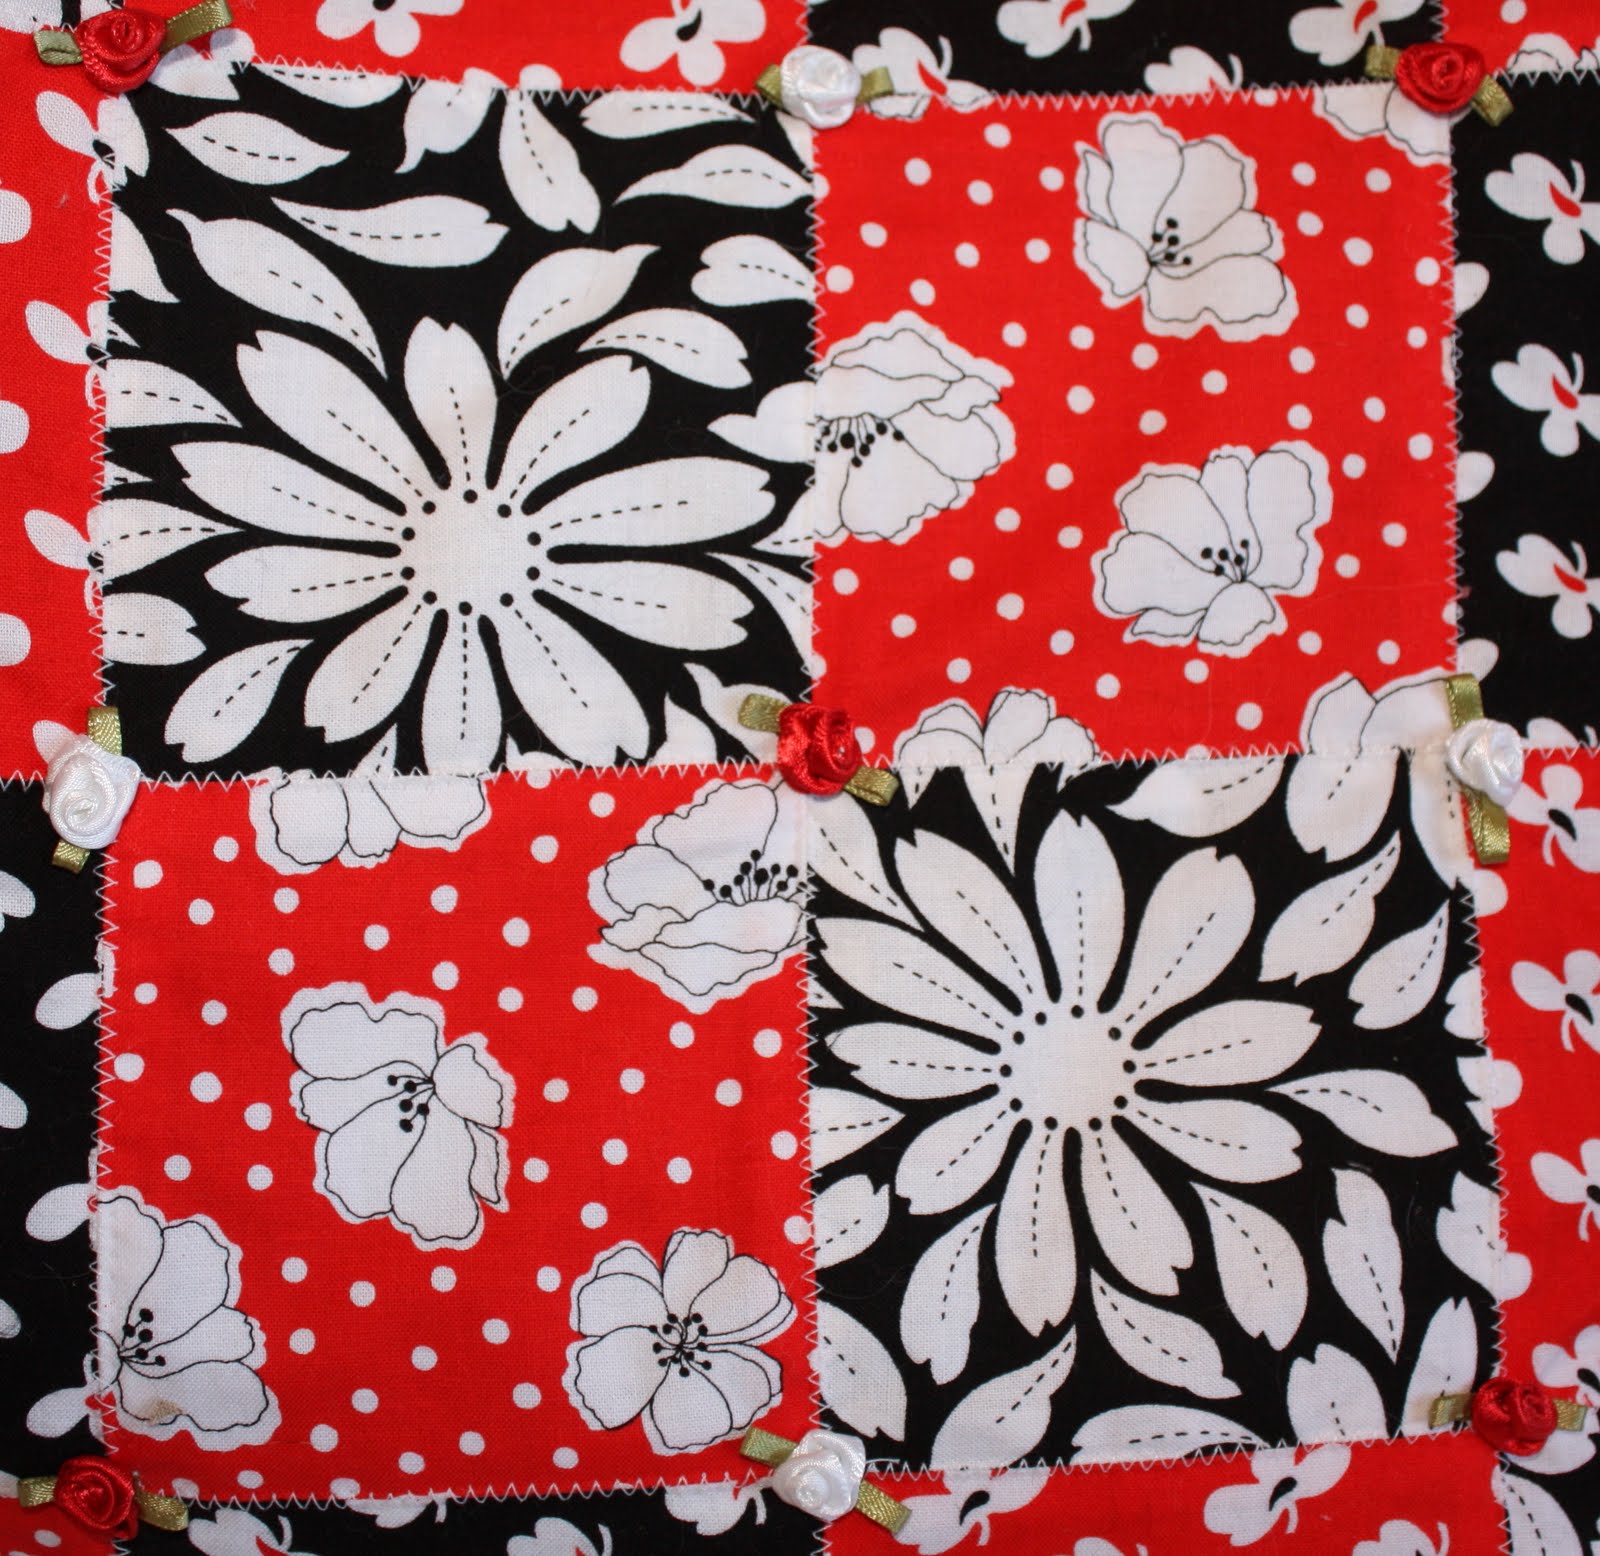
Emma Faye Quilted Tote made with Poppy Lane fabric

I have a few more sneak peeks at totes I've been making. This cheery red, black and white tote is made using blocks from Poppy Lane by Alice Monroe fabrics. This deep tote will hold your laptop, your shopping purchases and double as a purse when you are at the market, mall or on your way to the office.

Between each block I've added more flower buds. The quilt block pattern is backed with batting and a simple zigzag stitch is added to quilt between the blocks.

Inside the bag, I've used a satin lining and added two pockets which are also adorned with ribbon and lace and more flowers. As well, so you don't lose your keys in the bottom of the bag, I've added a key clip for quick access to your keys.

The tote measures approximately 14" X 13". Nice and roomy.

I'm calling my patchwork quilts the Emma Faye Tote, named in honor of my paternal grandmother. Both of my grandmothers were influencial in my love and learning to sew. I have one more Emma Faye Tote to show you and then I'll present my Alice Tote, named for my maternal grandmother. The Alice tote is a different style.

All totes will soon be posted in my Etsy shop so I hope you'll continue to keep checking in to see what is new.

Cheers!

Jennifer

Saturday, November 6, 2010
Happy one year GOTCHA Day to my Gypsy mare.

One year ago a life long dream of mine to own a horse came true. What I didn't ever begin to imagine in my dream of owning a horse was how much a part of you your horse becomes. Gypsy means the world to me and I can't imagine a day without her.

So here is my feeble first attempt at a little one year video from the day I first saw and met Gypsy, to when she was delivered to the barn where I keep her and just a few of many happy days we have shared together.

Wednesday, November 3, 2010

Stampin' Up! fabric tote bag and lapel flower

How thrilled I was when I learned that Stampin' Up! is now offering fat quarters of fabric selections! Not only are coordinating fabrics available in the winter mini catalog, but also coordinating buttons and seam binding. I didn't hesitate a moment before placing my order.

I knew immediately that the "Deck the Halls" designer fabric would work perfectly for a patchwork quilt bag. I made up a pinwheel pattern and set out cutting and sewing and piecing the fabric pieces together. Using the "cherry cobbler" fabric on top as an added header piece to the bag I wove the seam binding through some ribbon and added the a "cherry cobbler" colored button in the center of the bag.
I love making and using totes and I've come to discover that no tote bag is complete without added inside pockets and a key clip. My bags are deep enough to carry large items but I don't want to have to worry about digging in the bottom to find my keys or cell phone or pen. So I've attached a key clip as well as two inside pockets.

I never can throw away scraps of fabric and this was no exception. Recently, I was one of several very lucky winners of ABBEY LANE QUILTS book titled, "Blooming Possibilities." This delightful book contains patterns for flowers, bags and hats. The flower I made is made by following the instructions in the book for the LIZZIE flower. Using my Nestibilities large circle dies I cut out layers of the fabric and netting, layered them together, slashed, wetted and shredded the "petal" and added the seam binding for leaves and stem and a button in the center. I attached a pin back.

I think this flower is fun attached to the tote bag and also can be used as a lapel pin on your winter coat or perhaps pinned to your winter hat.

I have spent this past month since my last post busily sewing. I've created a number of different tote bags in beautiful fabrics and styles and perfect for the coming holidays to give as gifts as well as tote your packages in as you do your holiday shopping. Coming very soon, I'll post my new Etsy shop. In the meantime I'll preview some of the bags.

While I'm on the topic of Etsy, my eventual plan is to carry not only tote bags but also dog/pet items, as well as children's toys and clothing. Those are longterm goals, but to begin with I'll feature a variety of totes.

Until next time...

Cheers!

Jennifer